Removing the “Proudly powered by WordPress” line from your site’s footer takes about 30 seconds on a modern block theme and a few more steps on a classic theme. Which method to use depends entirely on which kind of theme you’re running.
Quick decision:
- Block theme (Twenty Twenty-Four, Twenty Twenty-Five, Kadence Blocks-based themes, anything built for the Site Editor): use Method 1 (Site Editor).
- Classic theme that has a Customizer footer option (Astra, GeneratePress, Kadence, OceanWP, Blocksy): use Method 2 (theme settings).
- Classic theme without a footer setting (Twenty Twenty-One, Twenty Nineteen, most older themes): use Method 3 (plugin) or Method 4 (child theme).
- Page builder (Elementor Pro footer template, Divi, Bricks): edit the footer template directly in the builder.
Not sure which type of theme you have? Go to Appearance in your WP admin. If you see Editor under Appearance, you’re on a block theme. If you see Customize instead, you’re on a classic theme.
- On a modern block theme, you remove the “Proudly powered by WordPress” footer line in the Site Editor in about 30 seconds.
- On classic themes, use the Customizer, theme settings, a child theme footer edit, or your page builder’s footer.
- Hiding it with CSS is a quick fix but not ideal, since the markup still loads.
- Which method works depends on whether your theme is block-based, classic, or built with a page builder.
Method 1: Block theme (Site Editor)
This is the method for Twenty Twenty-Four, Twenty Twenty-Five, and any theme that supports full site editing. No child theme, no FTP, no code.
- In WP admin, go to Appearance → Editor.
- In the left sidebar, click Patterns (or Template Parts in some theme setups), then open Footer.
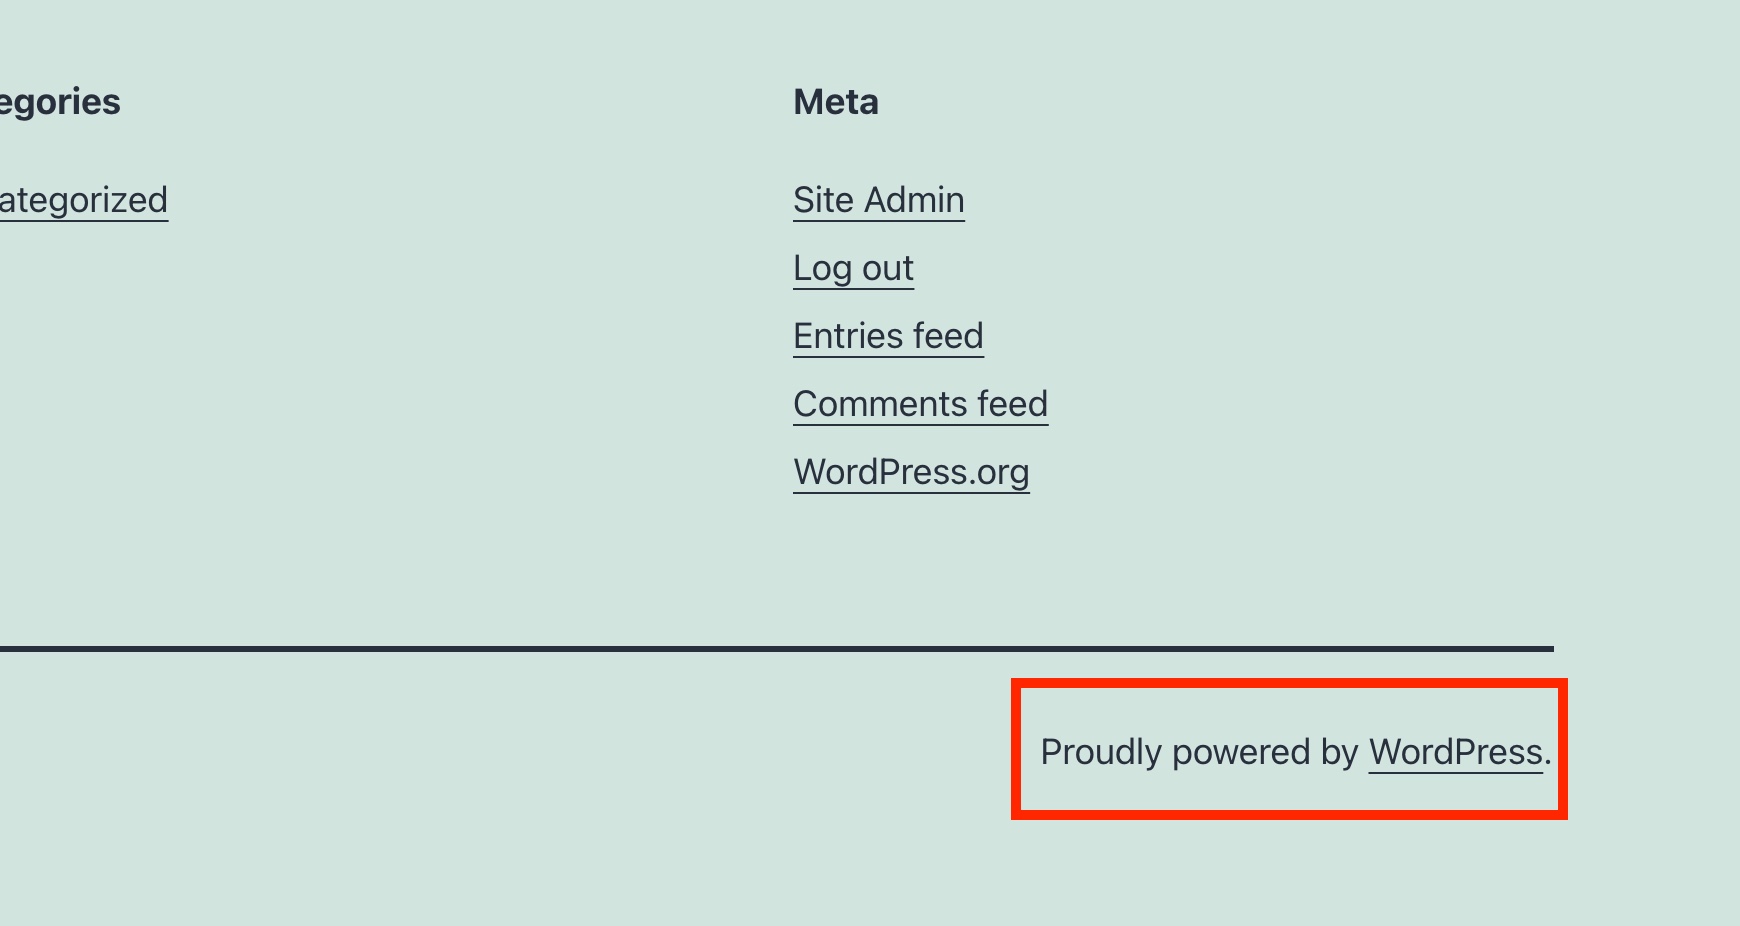
- You’ll see the Site Editor open with the footer loaded. Click the block that contains “Proudly powered by WordPress.”
- Either delete the block entirely or edit the text to say whatever you want (for example, a copyright line with your site name).
- Click Save in the top right.
The change applies site-wide immediately. If you want the footer back to the default later, the Site Editor has a Reset option under the footer template part’s three-dot menu.
If you don’t see a “Powered by WordPress” block specifically, it may be inside a Site Tagline or Paragraph block that combines multiple elements. Click around the footer area until you find the block containing the text.
Method 2: Theme settings / Customizer
A lot of classic themes include a footer-text option in the Customizer or their own dashboard panel. If you’re running any of these, try this first before going near code:
- Astra: Appearance → Customize → Footer Builder → edit the Copyright section.
- GeneratePress: Appearance → Customize → Layout → Footer → Copyright field. Set to blank or replace with your own text.
- Kadence: Appearance → Customize → Footer → Bottom Row → HTML 1.
- OceanWP: Appearance → Customize → Footer Bottom → Copyright.
- Blocksy: Appearance → Customize → Footer → Copyright.
- Neve: Appearance → Customize → Footer → Footer Options → Copyright.
Even if your specific theme isn’t on that list, go to Appearance → Customize and look for a section called Footer, Footer Bottom, or Copyright. Most modern classic themes have something along those lines.
Method 3: Use a plugin (classic themes only)
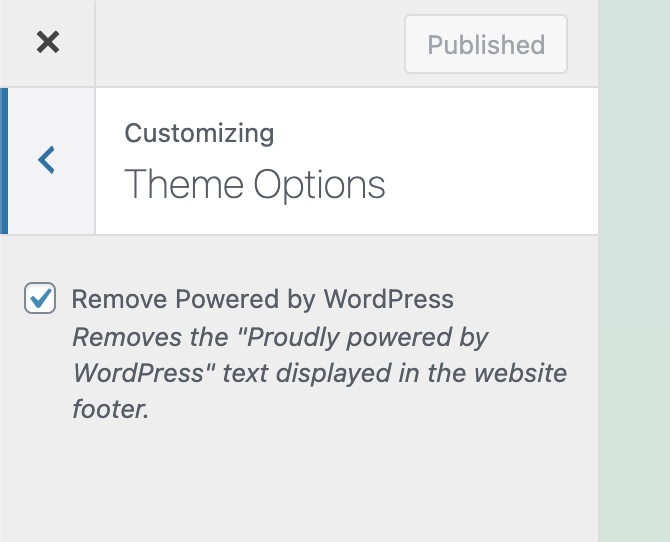
If your theme is a classic theme without a footer setting (Twenty Twenty-One, Twenty Nineteen, or an older free theme), the simplest code-free option is the Remove Powered By WordPress plugin.
Install and activate. It adds a new option in the Customizer that strips the “Proudly Powered by WordPress” message on every page.
Important: this plugin targets the footer hook in classic WordPress themes. It doesn’t work on block themes (use Method 1 instead) or on themes that render their footer through a page builder template (edit the template directly).
If you want full control over exactly what the footer renders, override footer.php in a child theme. This works on any classic theme that stores its footer HTML in a footer.php file (most of them).
Heads up: this method doesn’t apply to block themes, because block themes don’t ship a footer.php at all. Use Method 1 for those.
- Create a child theme for your parent theme. If you don’t have one yet, the free Child Theme Generator plugin sets one up in a click. See the full child theme guide for the manual approach.
- Activate the child theme under Appearance → Themes.
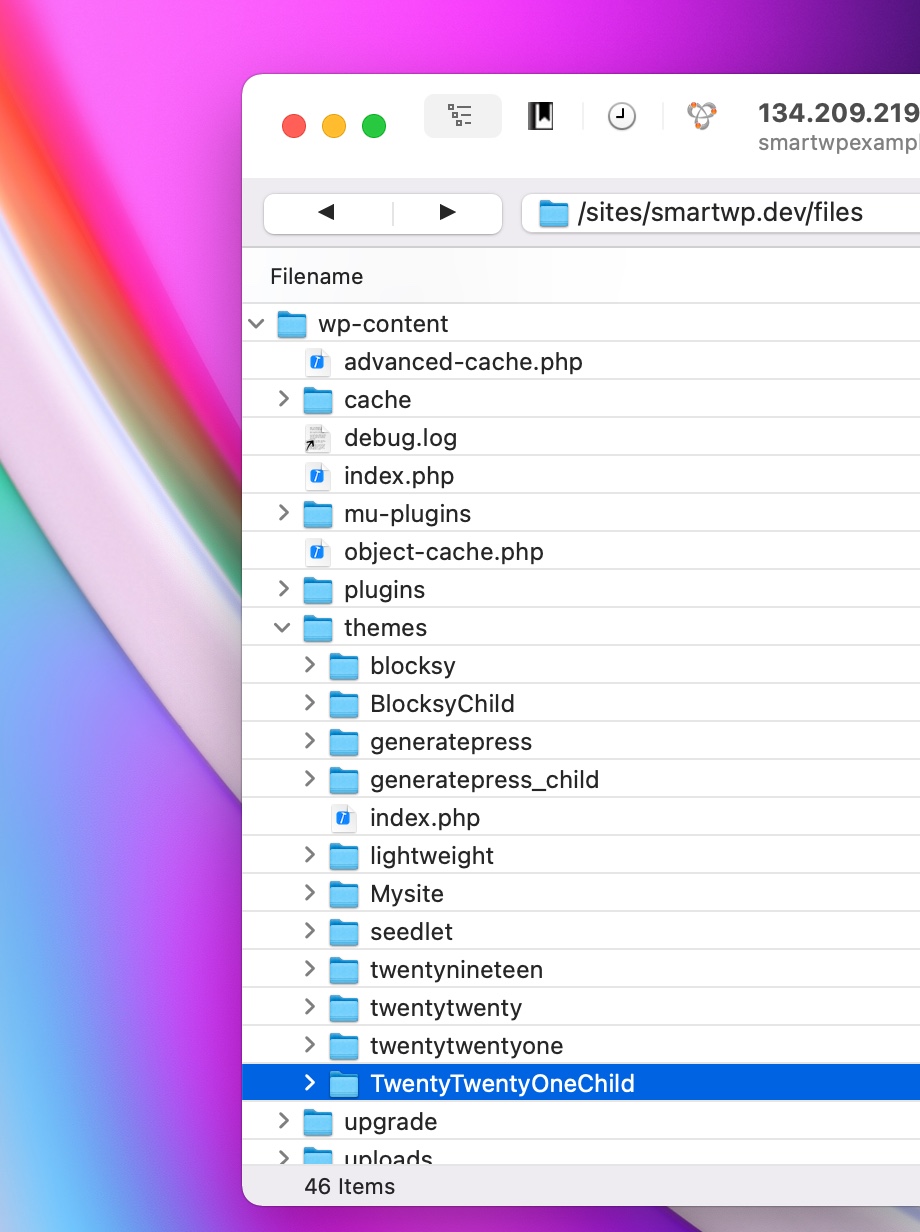
- Connect to your site over FTP/SFTP (or use your host’s file manager). Navigate to the parent theme’s folder in
wp-content/themes/and downloadfooter.php. - Upload
footer.phpinto your child theme’s folder (same relative path). - Open the copy in your child theme and find the block with “Proudly powered by WordPress.” In Twenty Twenty-One it looks like:
<div class="powered-by">
    <?php
    printf(
        /* translators: %s: WordPress. */
        esc_html__( 'Proudly powered by %s.', 'twentytwentyone' ),
        'WordPress'
    );
    ?>
</div>
Delete that block (or replace the text with a copyright line of your own). Save and re-upload.
The child theme’s footer.php now overrides the parent theme’s version. Parent theme updates won’t touch it.
If your footer is actually being rendered by Elementor Pro, Divi, or Bricks (which replace the theme’s PHP footer with a visual template), you need to edit the template inside the builder, not the theme.
- Elementor Pro: Templates → Theme Builder → Footer. Open your active footer template, delete or edit the “Powered by” widget.
- Divi: Divi → Theme Builder → open the Global Footer template, edit the module containing the text.
- Bricks: Bricks → Templates → Footer template, edit the element containing the text.
- Beaver Builder Themer: Beaver Builder → Themer Layouts → Footer → edit the layout.
If your site has both a page builder footer AND a theme-default footer showing “Proudly powered by WordPress,” it usually means the page builder template isn’t actually set as the site footer. Check the builder’s display conditions.
Method 6: Hide it with CSS (quick fix, not recommended long-term)
If you can’t find the right method for your theme and just need the text gone right now, CSS will hide it. This doesn’t actually remove the text from the HTML source, but it takes it out of view for visitors.
Go to Appearance → Customize → Additional CSS (or the Site Editor’s Styles → Custom CSS for block themes) and add:
.site-info,
.powered-by,
.wp-block-site-title + p,
footer .site-info {
    display: none;
}
The exact class depends on your theme. To find it: right-click the “Proudly powered by WordPress” text on your site, choose Inspect, and look at the class name of the element containing it. Swap that class in place of the selectors above.
CSS hiding is fine as a stopgap, but the text is still in your HTML source. For a clean removal, one of the methods above is better. See our full guide on adding custom CSS to WordPress for the cleanest way to manage CSS overrides.
Why your first method probably failed
The most common reason tutorials fail on this is theme mismatch. A method that works on Twenty Twenty-One (classic) won’t work on Twenty Twenty-Four (block), and vice versa. Match the method to your theme type:
- If you edited
footer.phpbut nothing changed on a block theme (Twenty Twenty-Four or later), that’s why. Block themes don’t usefooter.php. Use Method 1. - If you installed the Remove Powered By WordPress plugin and the text stuck around, your theme isn’t hooking the footer through the standard WP footer action. Try Method 1 (block theme) or Method 2 (theme Customizer).
- If you edited a child theme’s
footer.phpbut the site still shows the old text, the child theme may not be active. Check Appearance → Themes and activate the child, or confirm the parent theme really shipsfooter.php(most do, but a few route through templates instead). - If you edited an Elementor/Divi/Bricks footer template but it’s still showing, the builder template isn’t set as your site’s footer. Check the display conditions inside the builder’s Theme Builder / Themer panel.
- If the text appears on some pages but not others, you probably have two footer templates and only edited one. This happens a lot with builders. Edit both, or set display conditions to cover the whole site.
Frequently asked questions
How do I remove the Proudly Powered by WordPress text?
The method depends on your theme. Block themes (Twenty Twenty-Four and newer): edit the footer in Appearance → Editor. Classic themes with a Customizer footer setting (Astra, GeneratePress, Kadence): edit the copyright field. Classic themes without one: use the Remove Powered By WordPress plugin, or override footer.php in a child theme.
Is it legal to remove Proudly Powered by WordPress?
Yes. WordPress is released under the GPL, which places no requirement on you to link back or credit WordPress in your site footer. The “Proudly powered by WordPress” text is a default that theme authors include; you’re free to remove or replace it.
Where is footer.php in a block theme?
It isn’t there. Block themes (Twenty Twenty-Four, Twenty Twenty-Five, any theme built for full site editing) don’t ship a footer.php file. The footer is stored as a template part inside the theme’s parts/ or patterns/ folder and edited through the Site Editor at Appearance → Editor.
How do I know if I’m using a block theme or a classic theme?
In WP admin, hover over Appearance in the sidebar. If you see Editor, you’re on a block theme. If you see Customize (and no Editor), you’re on a classic theme. Some classic themes with the Gutenberg plugin can show both; in that case the primary setting for footer changes is still the Customizer.
Can I replace the text with my own copyright notice?
Yes. Whichever method you use (Site Editor, Customizer field, child theme footer.php, or page builder), you can swap the text for something like © 2026 Your Site Name. All rights reserved. The easiest way to keep the year current automatically on a block theme is the Site Editor’s dynamic Current Year text option.
The Remove Powered By WordPress plugin didn’t work. What now?
That plugin targets the standard WP footer credit hook in classic themes. If you’re on a block theme, a theme with its own custom footer (most premium themes), or a page builder footer, the plugin has nothing to hook into. Switch to Method 1 (Site Editor) for block themes, Method 2 (theme Customizer) for classic themes that have a footer setting, or Method 5 for page builders.
Will removing the footer text break anything?
No. It’s a plain text credit, not a functional element. Deleting it doesn’t affect WordPress core, plugins, or theme functionality. On block themes you can restore the default via the Site Editor’s reset option. On classic themes using a child theme override, just delete or edit your child theme’s footer.php to roll back.
Bottom line
The single biggest reason tutorials on this topic fail is that the method is written for classic themes but the reader is on a block theme (or vice versa). Figure out your theme type first (Appearance → Editor means block theme; only Customize means classic theme), then pick the matching method from above. The Site Editor route for block themes is the fastest, the theme Customizer route is fastest for classic themes with a footer setting, and the child theme route is the bulletproof option for anyone who wants real control.
Related: the full guide on WordPress child themes, adding custom CSS to WordPress, or customizing the WordPress login page.


69 Responses
It help me, thanks, removed success
Thank You
Thanks for the help
Thanks for the help…very useful
Sir mostly the same time as the same time information on the sahashka.com
Nice
Information website
Worderfu ll
nice report
Useful tips, favorite!
Thank you so much I was struggling for a while!!!
If only it was that easy….lol. It takes a lot of time and effort
thanks for sharing
This article provides a clear and concise tutorial on how to remove the “Powered by WordPress” text from the footer of a WordPress website. The author covers two methods: using a plugin and manually editing the code. The instructions are easy to follow and the article includes screenshots to help illustrate the steps. Overall, this is a helpful resource for anyone who wants to remove the “Powered by WordPress” text from their website.
Thanks for the help
Thank you so much I was struggling for a while!!!
bruh
Navigating your Startup website feels like strolling through a digital art gallery – each page carefully crafted, every click a brushstroke of creativity. 🎨✨
Informasi ini bagus
“I invent nothing, I rediscover.” – Auguste Rodin”강남노래방
Wow! Your startup website is absolutely stunning! Navigating through it feels like taking a leisurely walk through a mesmerizing digital art gallery. The design and aesthetics are truly exceptional. It’s not just a website, it’s an immersive experience! Keep up the fantastic work and continue making waves in the startup world. I can’t wait to see what other masterpieces you have in store for us. 💫✨ If you want to experience this awe-inspiring website yourself
bruh
hi
Thanks for your useful sharing. I did it Thank you for sharing your experience. I tried it on my website and it worked perfectly.on my website and it was successful.
“An adept analysis of WordPress attribution customization. The discourse on plugin versus manual intervention resonates with seasoned developers. Emphasizing the role of child themes underscores a commitment to code integrity. A succinct yet technical exploration of a crucial aspect of WordPress site management.”
After implementing the suggestions, I noticed a significant improvement. The article’s practical tips made a positive impact on my Website.
After following the suggestions, I noticed a big improvement. The helpful tips in the article made a positive difference on my website.
Thanks for the informative guide on removing the “Proudly powered by WordPress” message; it clearly explains both a simple plugin method and a more advanced manual method using a child theme.
This article provides informative steps on removing the “Proudly powered by WordPress” footer message, offering both a simple plugin method and an advanced manual approach using a child theme—thanks for the helpful info! The practical tips in the article significantly boosted the performance of my website https://pinvideodownloader.com/
You can easily remove the “Proudly powered by WordPress” footer message. Use a plugin for a quick fix or create a child theme for advanced customization. Both methods help you personalize your site.
Thank you for this Article. Is really helpfull.
I’m glad you found the article helpful. Thank you for the feedback!
“Clear instructions on modifying footer.php via a child theme. This approach keeps parent theme updates intact while allowing for footer customization.”
Amazing Information Related to News
New Information Related to things
Thank you for this Article. Is really helpfull.
This article effectively covers two solid methods for removing the ‘Proudly powered by WordPress’ message. The plugin approach is great for those who prefer simplicity, while the child theme method offers flexibility for deeper customization. The tips on using FTP to edit footer.php without affecting the parent theme are particularly useful. Overall, a well-rounded guide for WordPress users.
Thank you for this Article. Is really helpful.
If you’re looking to check the status of your SRD (Social Relief of Distress) grant, the process is simple. The SRD status check allows applicants to stay informed about the progress of their applications, ensuring they know when to expect payment or if there are any issues that need to be resolved. Make sure to visit the official website for accurate and up-to-date information.
For more information and to check your SRD status, click on this SRD Status Check.
If only it was that easy….lol. It takes a lot of time and effort
Discover the ultimate solution to skyrocket your Instagram followers! Top Follow Apk offers a seamless and secure way to gain real, engaging followers free of cost.
Random video chat is today’s most fun way to spend time and meet new people. In this field pioneered by Omelge, there is now Omegla Chat. With Omegla Chat, the world’s best alternative, you can video chat whenever you want, meet new people and make great friendships. And at no cost, completely free! You don’t need to search for Omegle App on google play anymore, you can use Omegla with your mobile or web browser.
nice info thanks sir improve my knowledge Support my website http://www.leadonion.com
This post is very enlightening and useful. I appreciate the knowledge you’ve imparted. Please continue to share such valuable content.
“Great guide on removing the ‘Powered by WordPress’ footer text! Both plugin and manual methods are explained clearly. If you’re also managing educational sites, tools like our CGPA to percentage converter can be helpful!
gud
Looking for engaging and educational stories for kids? Visit TheKidsStory.com for a variety of fun bedtime stories, fairy tales, and moral lessons that will inspire and entertain young minds.
“Call of Destiny is an outstanding service for anyone looking to find clarity in their life. The personalized forecasts are accurate and full of meaningful advice. I've used it to tackle difficult decisions and improve my relationships. It's been a wonderful journey, and I highly recommend it to everyone!”
“I've been taking Alpha Tonic for a month, and the difference is incredible. My energy levels have increased, and I feel more focused and confident. It's a fantastic supplement!”
your article help me understand better about how to remove “Powered By WordPress” by Plugin. thanks for sharing
your article help me understand better. thanx for sharing your knowledge.
I also discovered a solution of Increasing Instagram followers through top follow apk. As it offers unique and real followers by completing some simple steps.
Thank you so much for this amazing article, I literally got confused about how could I remove the “proudly powered by WordPress” text, but finally got the solution.
Great guide! Removing ‘Powered by WordPress’ makes a site look more professional—thanks for the clear steps!
This post is very enlightening and useful. I appreciate the knowledge you've imparted.
Wow, this is super helpful! I’ve always wanted to get rid of that “Powered by WordPress” thing. The plugin method seems easiest, gonna try that first. Thanks!
Hi Andy Feliciotti ,
Thanks for sharing detailed post about removing powered by wp. Can we use any free plugin for this as adding custom code is not advised for newbies?
In the world of finance, AI models are making real-time decisions about investments, risk, and fraud detection. Financial analysts who complete an Artificial Intelligence (AI) Strategy Course are equipped to understand and interpret these models critically. Strategic thinking ensures AI tools are used to enhance—not blindly dictate—financial decisions.
This was super helpful! I've been wanting to remove the “Powered by WordPress” text for a cleaner footer look. Thanks for the clear steps—worked perfectly for my site!
Vedu App is a popular Android streaming application that offers users access to a massive collection of movies, TV shows, web series, documentaries, cartoons, and even live channels—all without any subscription or sign-up here https://veduappsdownload.com/
Very helpful guide! Removing the ‘Powered by WordPress’ text is a small customization but it really makes the site look more professional. I remember struggling with similar customization while setting up my own blog where I share tutorials about CapCut. Since my site focuses on video editing guides, I wanted the design to look clean and distraction-free. For anyone running creative blogs (like tutorials or guides), customizing the footer definitely helps maintain a consistent branding. Thanks for the step-by-step explanation!
Finally, now I can remove Powered by WordPress from my website.
i was using a plugin to remove Powered by WordPress from my blog website. But thanks for sharing this method.
Useful info
Did the same on my WordPress site, took out the footer and it instantly felt more professional. We use that same approach at https://roxauto.com.au/, where every detail matters for a polished finish.
This blog post is truly impressive and full of valuable information. I really enjoyed reading it and appreciate the effort you put into explaining everything so clearly. Keep up the great work and continue sharing such insightful content.
I tried but failed!
This article provides informative steps on removing the 'Proudly powered by WordPress' footer message, offering both a simple plugin method and an advanced manual approach using a child theme—thanks for the helpful info! The practical tips in the article significantly boosted the performance of my website.
This is a great, concise guide! I was just looking into customizing my footer, and this explanation of the different methods for block and classic themes is super helpful. I especially appreciate the quick decision tip – made things much easier to navigate. Thanks for the clear instructions!
Great guide! I've always struggled with remembering which method to use for different themes, but your clear breakdown between block and classic themes makes it super easy to follow. Thanks for saving me time!