Migrating from WordPress.com to WordPress.org takes about an hour and four core steps: export your WordPress.com content as an XML file, set up self-hosted WordPress on a new host, import the file (with media attachments), then redirect your old WordPress.com URL to the new site. This guide walks through each step with screenshots.
WordPress powers about 42% of websites on the internet (per W3Techs as of 2026), making it the most popular CMS by a wide margin. For most people, their first WordPress site starts on the free WordPress.com platform.
While running a website on the free version of WordPress has its many advantages, any serious blogger or business will have to eventually migrate their website from WordPress.com to WordPress.org.
- Migrating from WordPress.com to WordPress.org takes about an hour and four steps: export your content, set up self-hosted WordPress, import the file, and redirect the old URL.
- Self-hosted WordPress.org gives you full control over plugins, themes, and monetization.
- Use the WordPress.com site-level redirect (around $13/year) so you don’t lose SEO during the move.
- For a hands-off move, many managed hosts will handle the migration for free.
Why Should You Migrate from WordPress.com to WordPress.org (Self-Hosted WordPress)?
Before the step-by-step, a quick refresher on why the move matters. WordPress.com (the hosted version run by Automattic) is great for getting started, but most serious bloggers and businesses outgrow it. Self-hosted WordPress.org gives you full control over your code, your plugins, your monetization, and your data.
If you want to follow along with a step-by-step tutorial video, then watch Andy take you through the 4 easy steps to migrating from WordPress.com to WordPress.org right here:
The main reason to move to the .org version of WordPress is that it offers you greater flexibility to customize your website than the .com version does. This is because with WordPress.org you can:
- Customize your code and all aspects of your site
- Install plugins to enhance the functionality of your website
- Buy and install premium WordPress themes
With WordPress.org, you can shape your site however you want. WordPress.com limits what you can change.
Another advantage of migrating to WordPress.org is that it’s easier to scale your business if you’re using your website as a money generating machine. Yes, you can monetize your WordPress.com website but that means upgrading to the paid plans that start at $48/year. And the tight restrictions make it not worth the money.
Other downsides to the .com version of WordPress include limited SEO control, limited analytics, and of course the dreaded branding and ads that are forced upon users. So yes, for anyone serious about running a professional website, migrating from WordPress.com to WordPress.org is a no brainer.
Before You Migrate Your Blog: Here’s What You Need (Checklist)
Before you start the migration itself, you need three things in place: WordPress hosting, a domain name, and a fresh WordPress.org install on the new host. Here’s what each one looks like.
The Right WordPress Hosting Plan
There are hundreds of WordPress hosts to pick from. The right one for you depends on budget, traffic, and how much you want to manage yourself. For most people moving off WordPress.com, a managed or shared WordPress plan is the sweet spot.
Without going into all the details comparing the best WordPress hosting plans, we recommend going with Bluehost as your WordPress hosting service:

This is because they offer some of the most affordable plans on the market. They also have some of the best features and support too. And that’s not to mention they’re one of only 3 hosting companies officially recommended by WordPress. Other WordPress hosting providers you can consider include:
For a more in-depth look at the right hosting plan for your WordPress.com to WordPress.org migration, check out our article on the best WordPress hosting plans.
Domain Name Registration
With hosting sorted, you can move on to the next requirement – domain name registration. Again, this is where Bluehost shines as they offer free domain registration for the first year on all their plans.
A domain name plays a critical role in the success of your website and should thus be taken seriously. While finding the perfect domain name is becoming increasingly difficult by the day, it’s still possible to get a .com extension of your preferred domain name. You just have to take your time.
Can’t think of a domain name? try our domain name generator.
If you’d rather register your domain through a separate domain name registrar. Examples include Cloudflare, Namecheap and Domain.com.
Install WordPress.org
Installing WordPress.org on your new host is usually a one-click process. Log in to your hosting account, find the WordPress installer in the dashboard, and follow the prompts.
The installer walks you through setting your site title and creating an admin username and password. That’s the account you’ll use to log in at yoursite.com/wp-admin once the install finishes.
With these 3 in place, you’re ready to migrate your website from WordPress.com to WordPress.org. So let’s get to it.
How to Migrate Your WordPress.com Website to WordPress.org (Self-Hosted) in 4 Easy Steps
With self-hosted WordPress (WordPress.org) installed, it’s easy to migrate your WordPress.com site to its new home. Here are 4 easy steps you’ll have to take.
1. Export Your WordPress.com Data
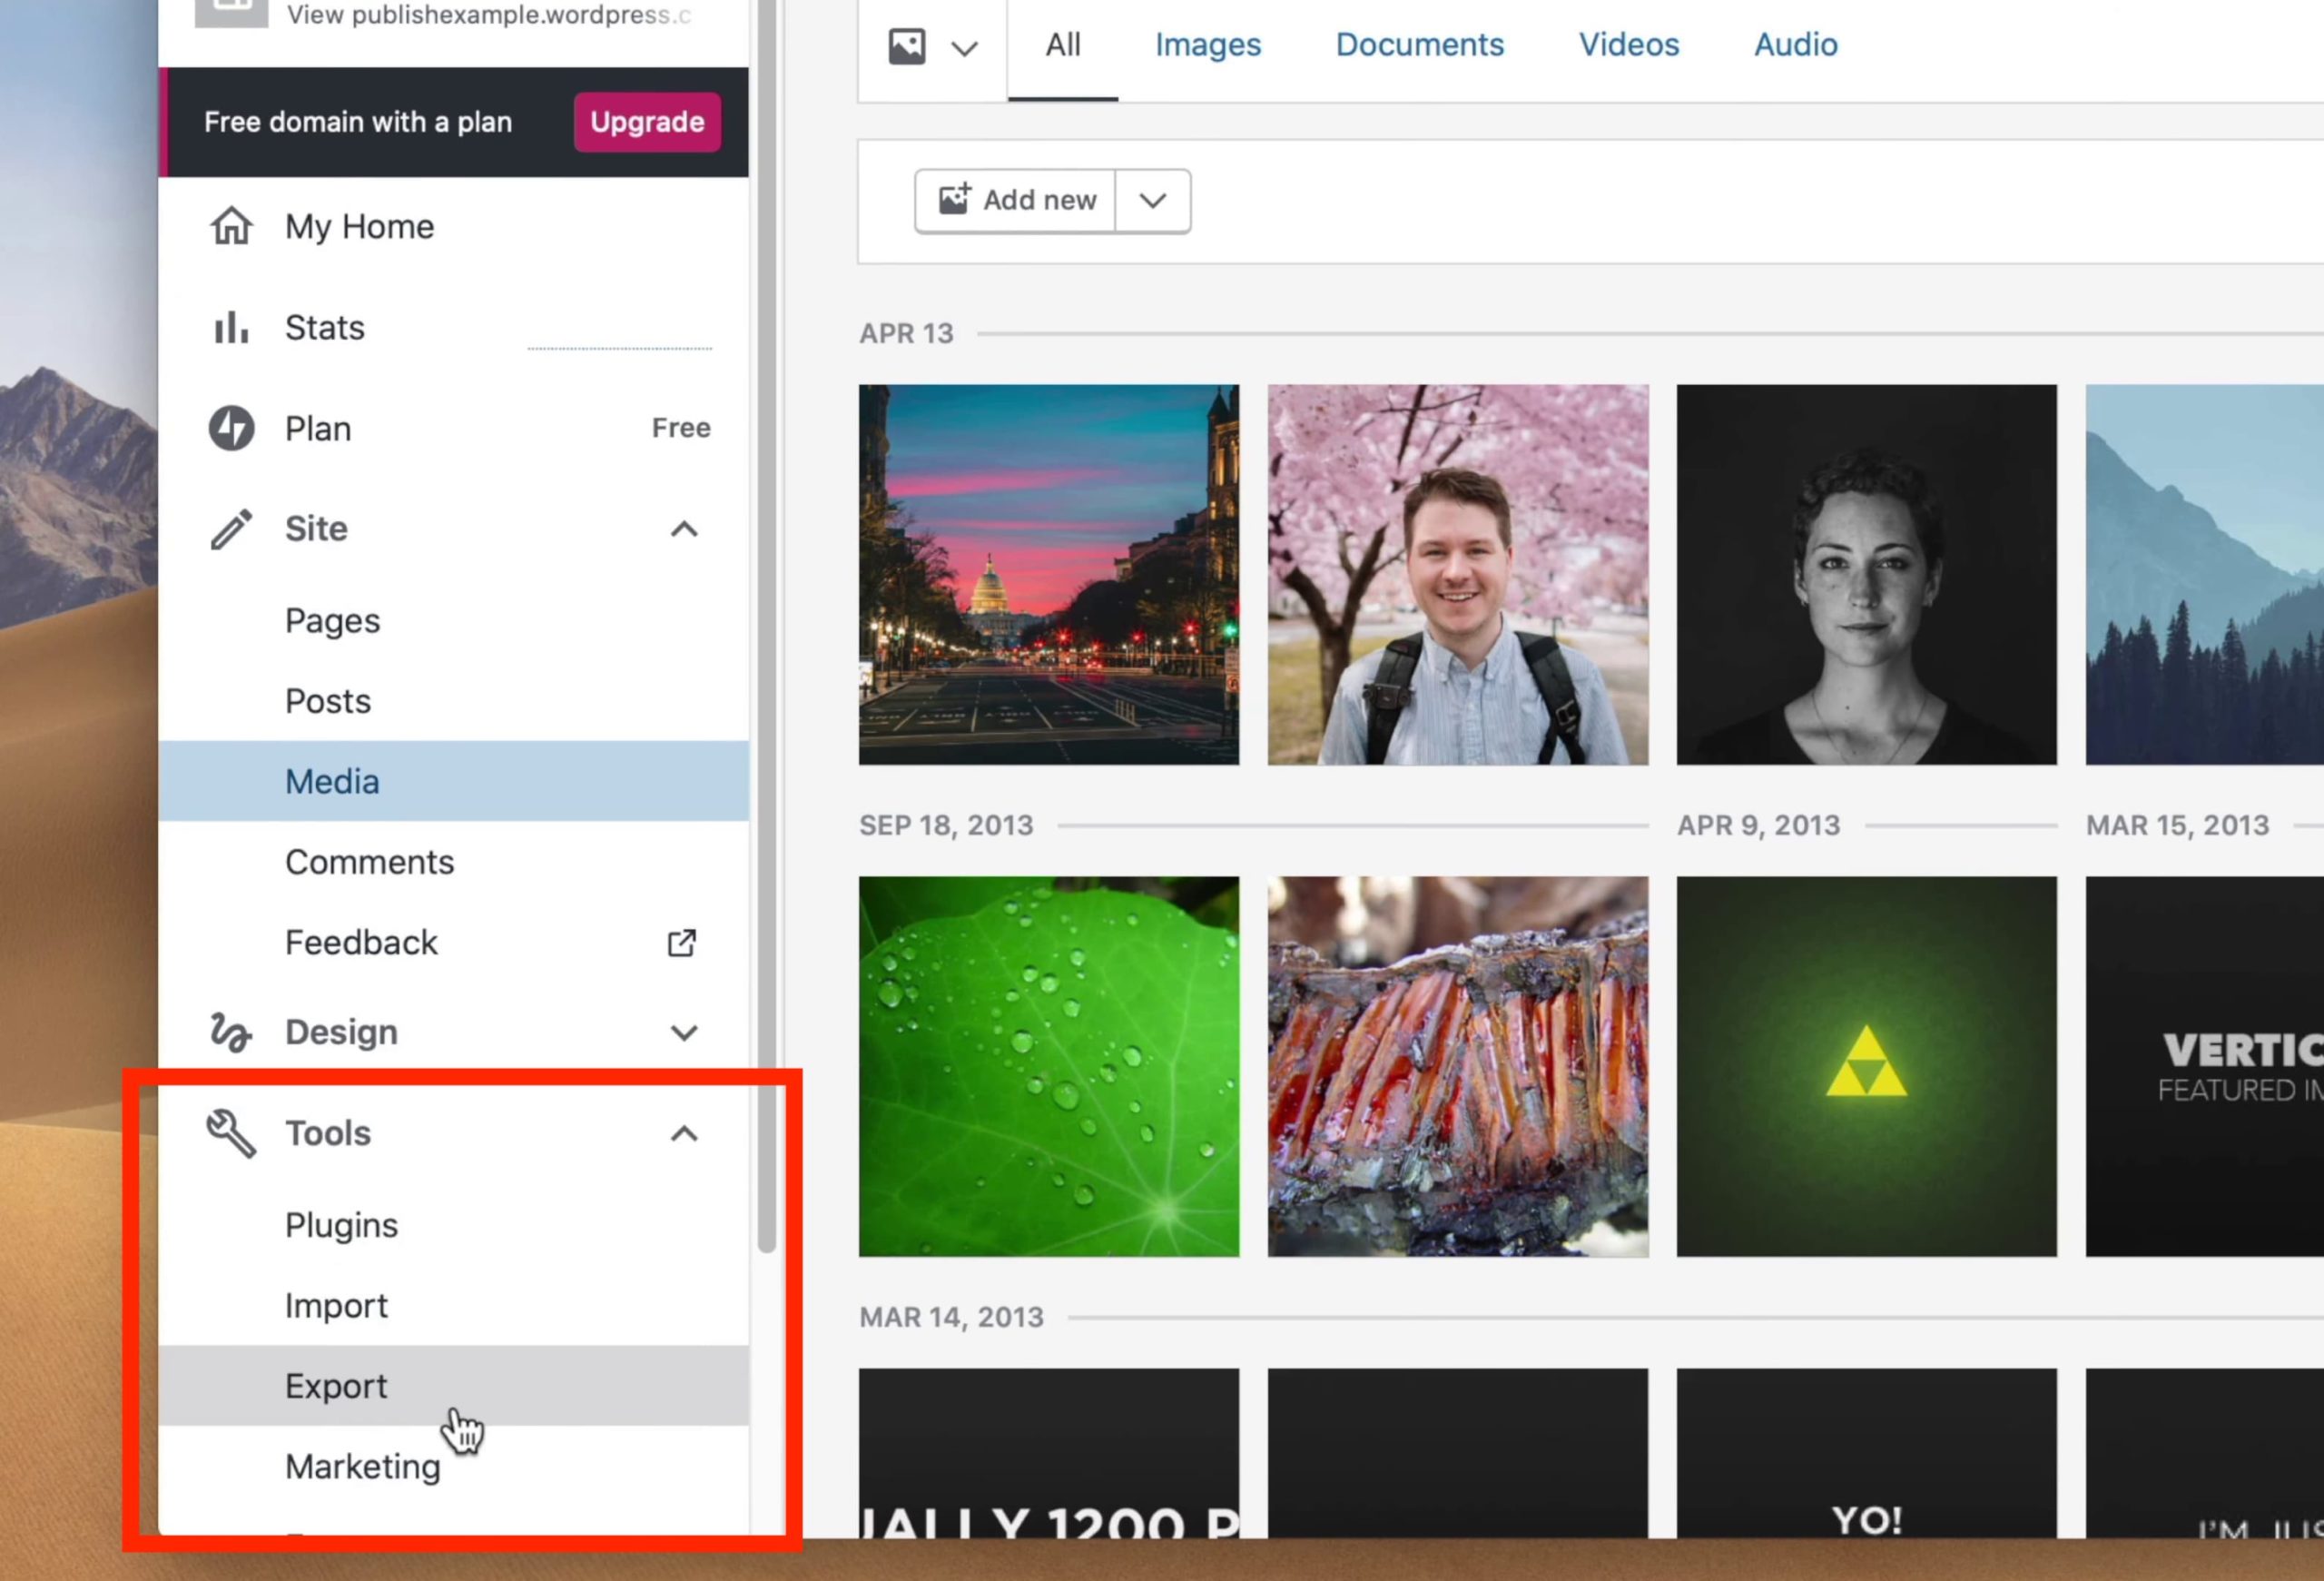
The first thing you’ll want to do in order to migrate your site from WordPress.com to WordPress.org is to export your WordPress.com site’s data. To do that, login to WordPress.com, go to the “My Sites” tab and click on WP Admin. This will take you to your WordPress.com dashboard. Once inside your dashboard, navigate to the “Tools” tab and select the “Export” option.
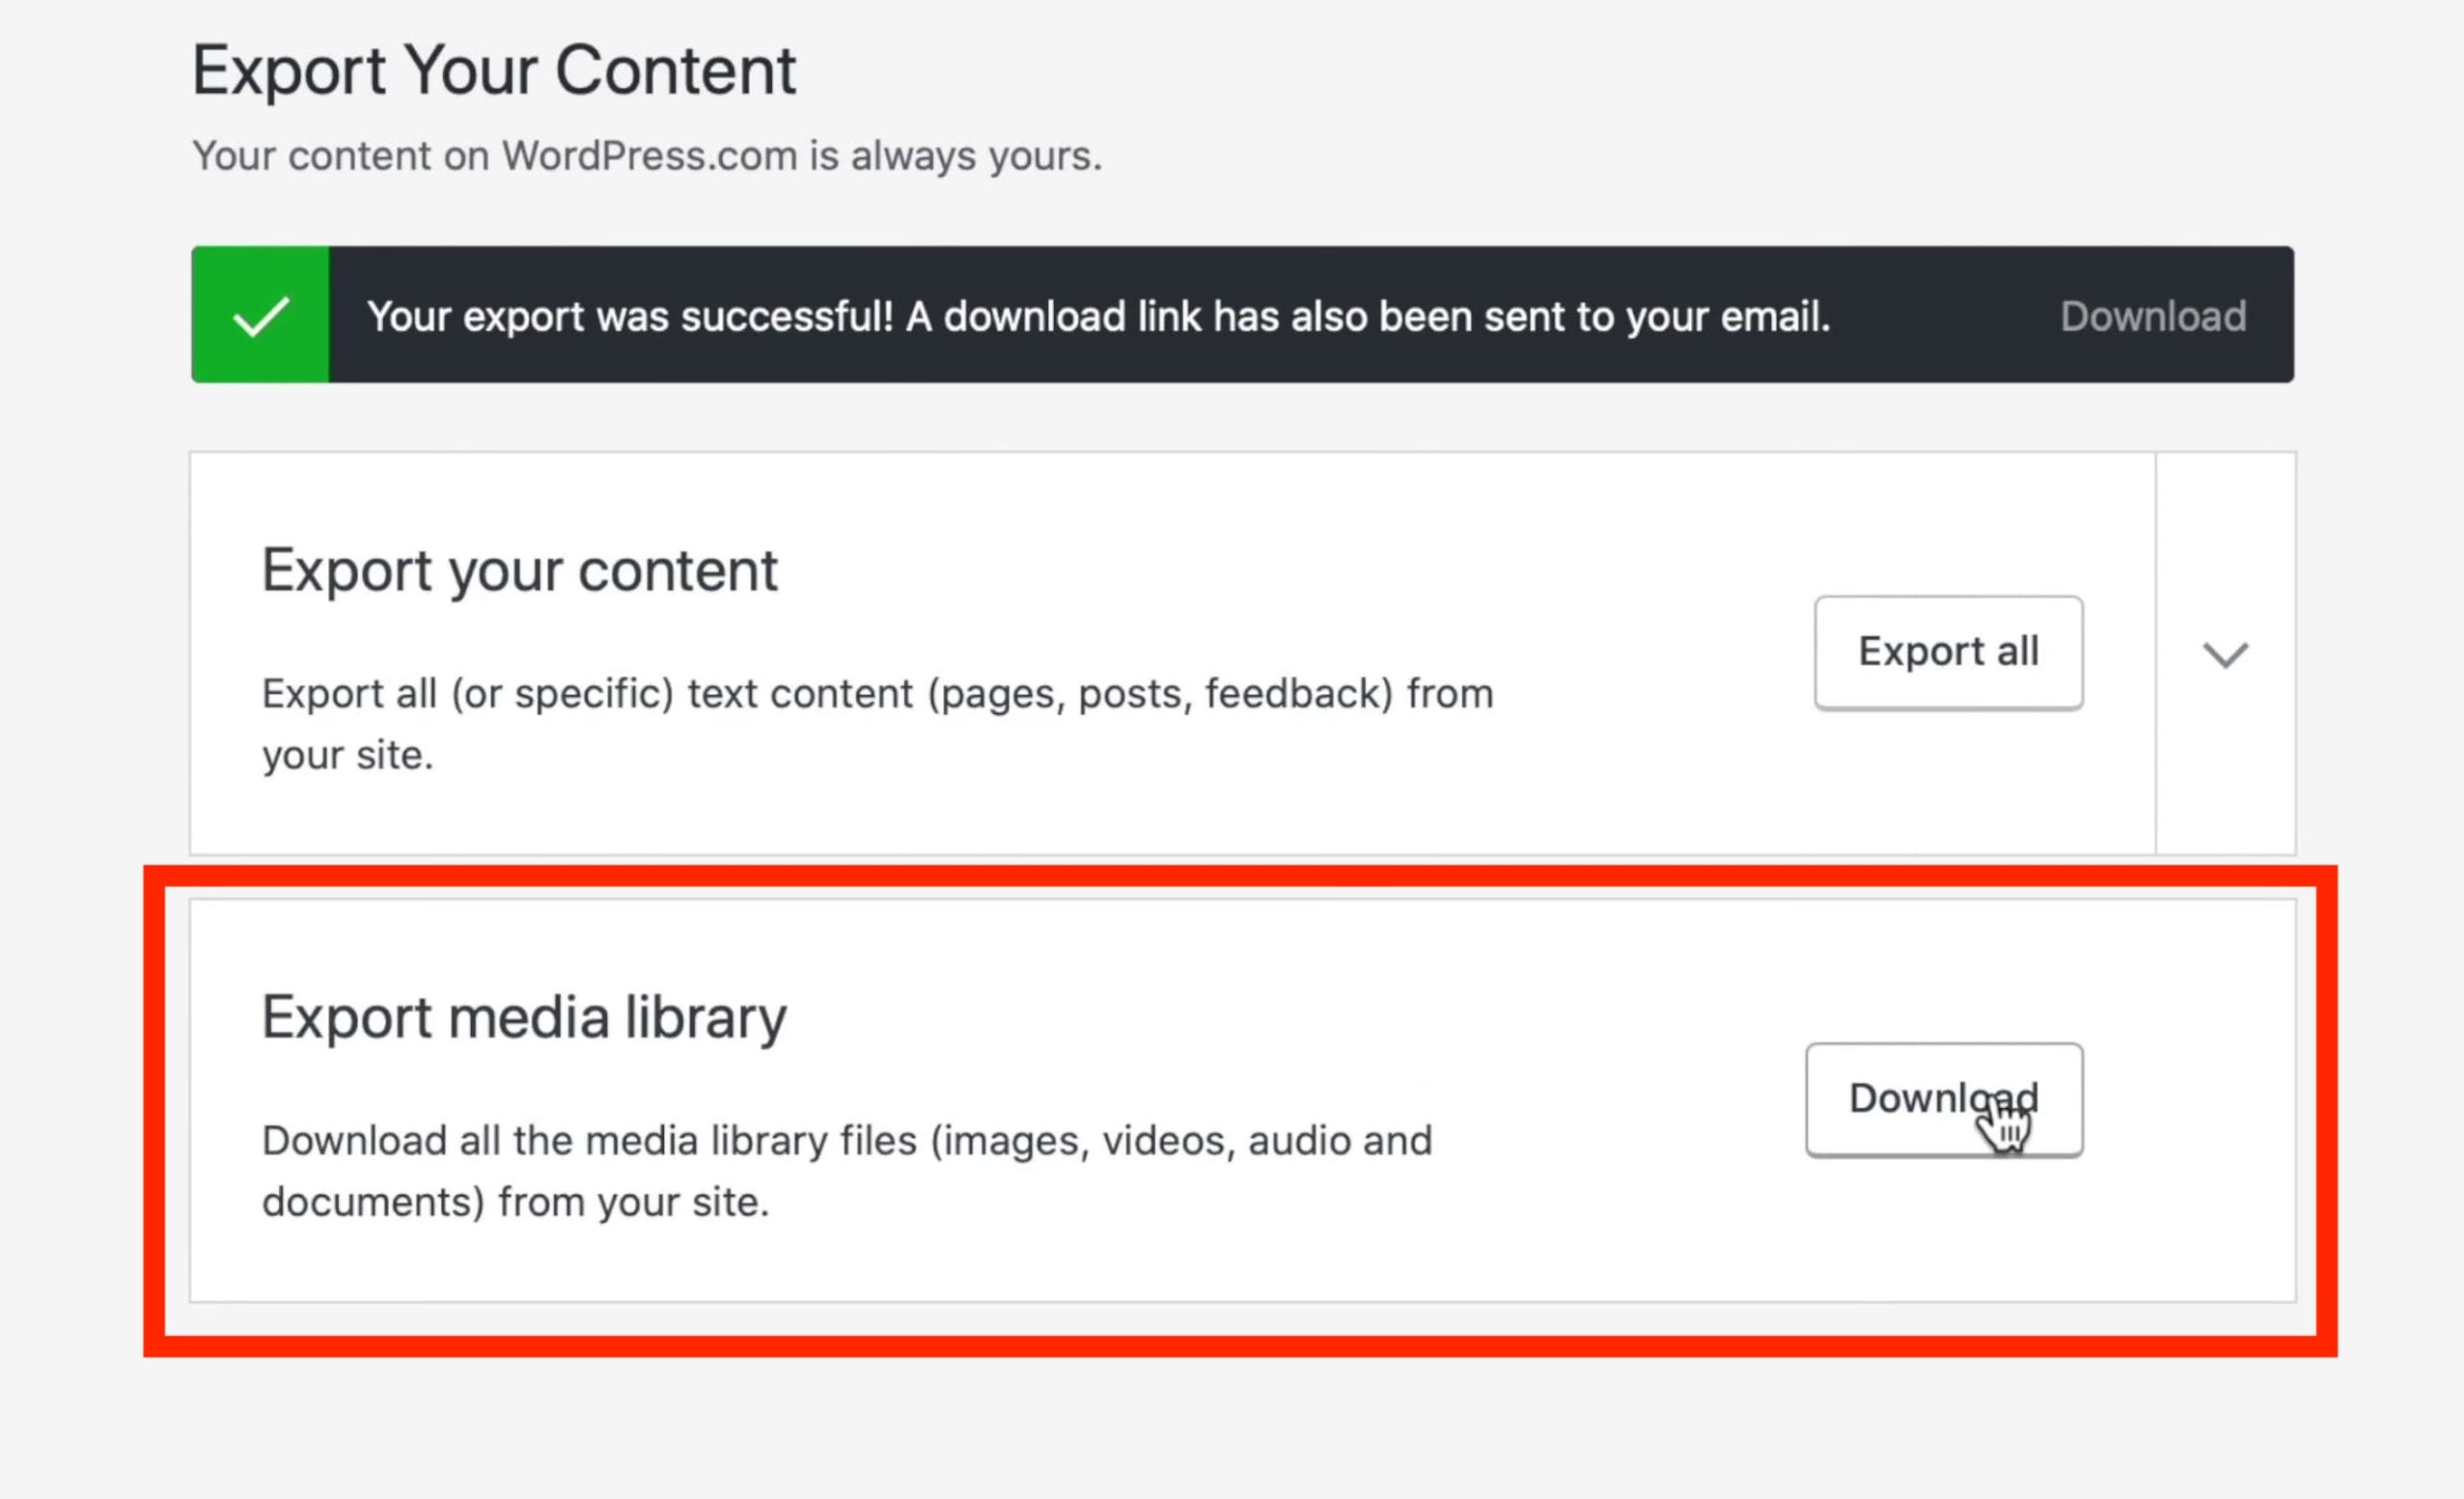
On the “Export Content” page, click the “Export All” button. Depending on how much content your site has, this can take anywhere from a few seconds to a few minutes.
WordPress.com emails you a download link when the export is ready, but if you wait on the page long enough, the link appears there too. The download is a zipped XML file containing every post, page, and media reference from your WordPress.com site.
Now that you’ve successfully exported your WordPress.com website’s files, you can move on to the next step – importing the files to your WordPress.org account.
2. Import Your Content/Data to WordPress.org
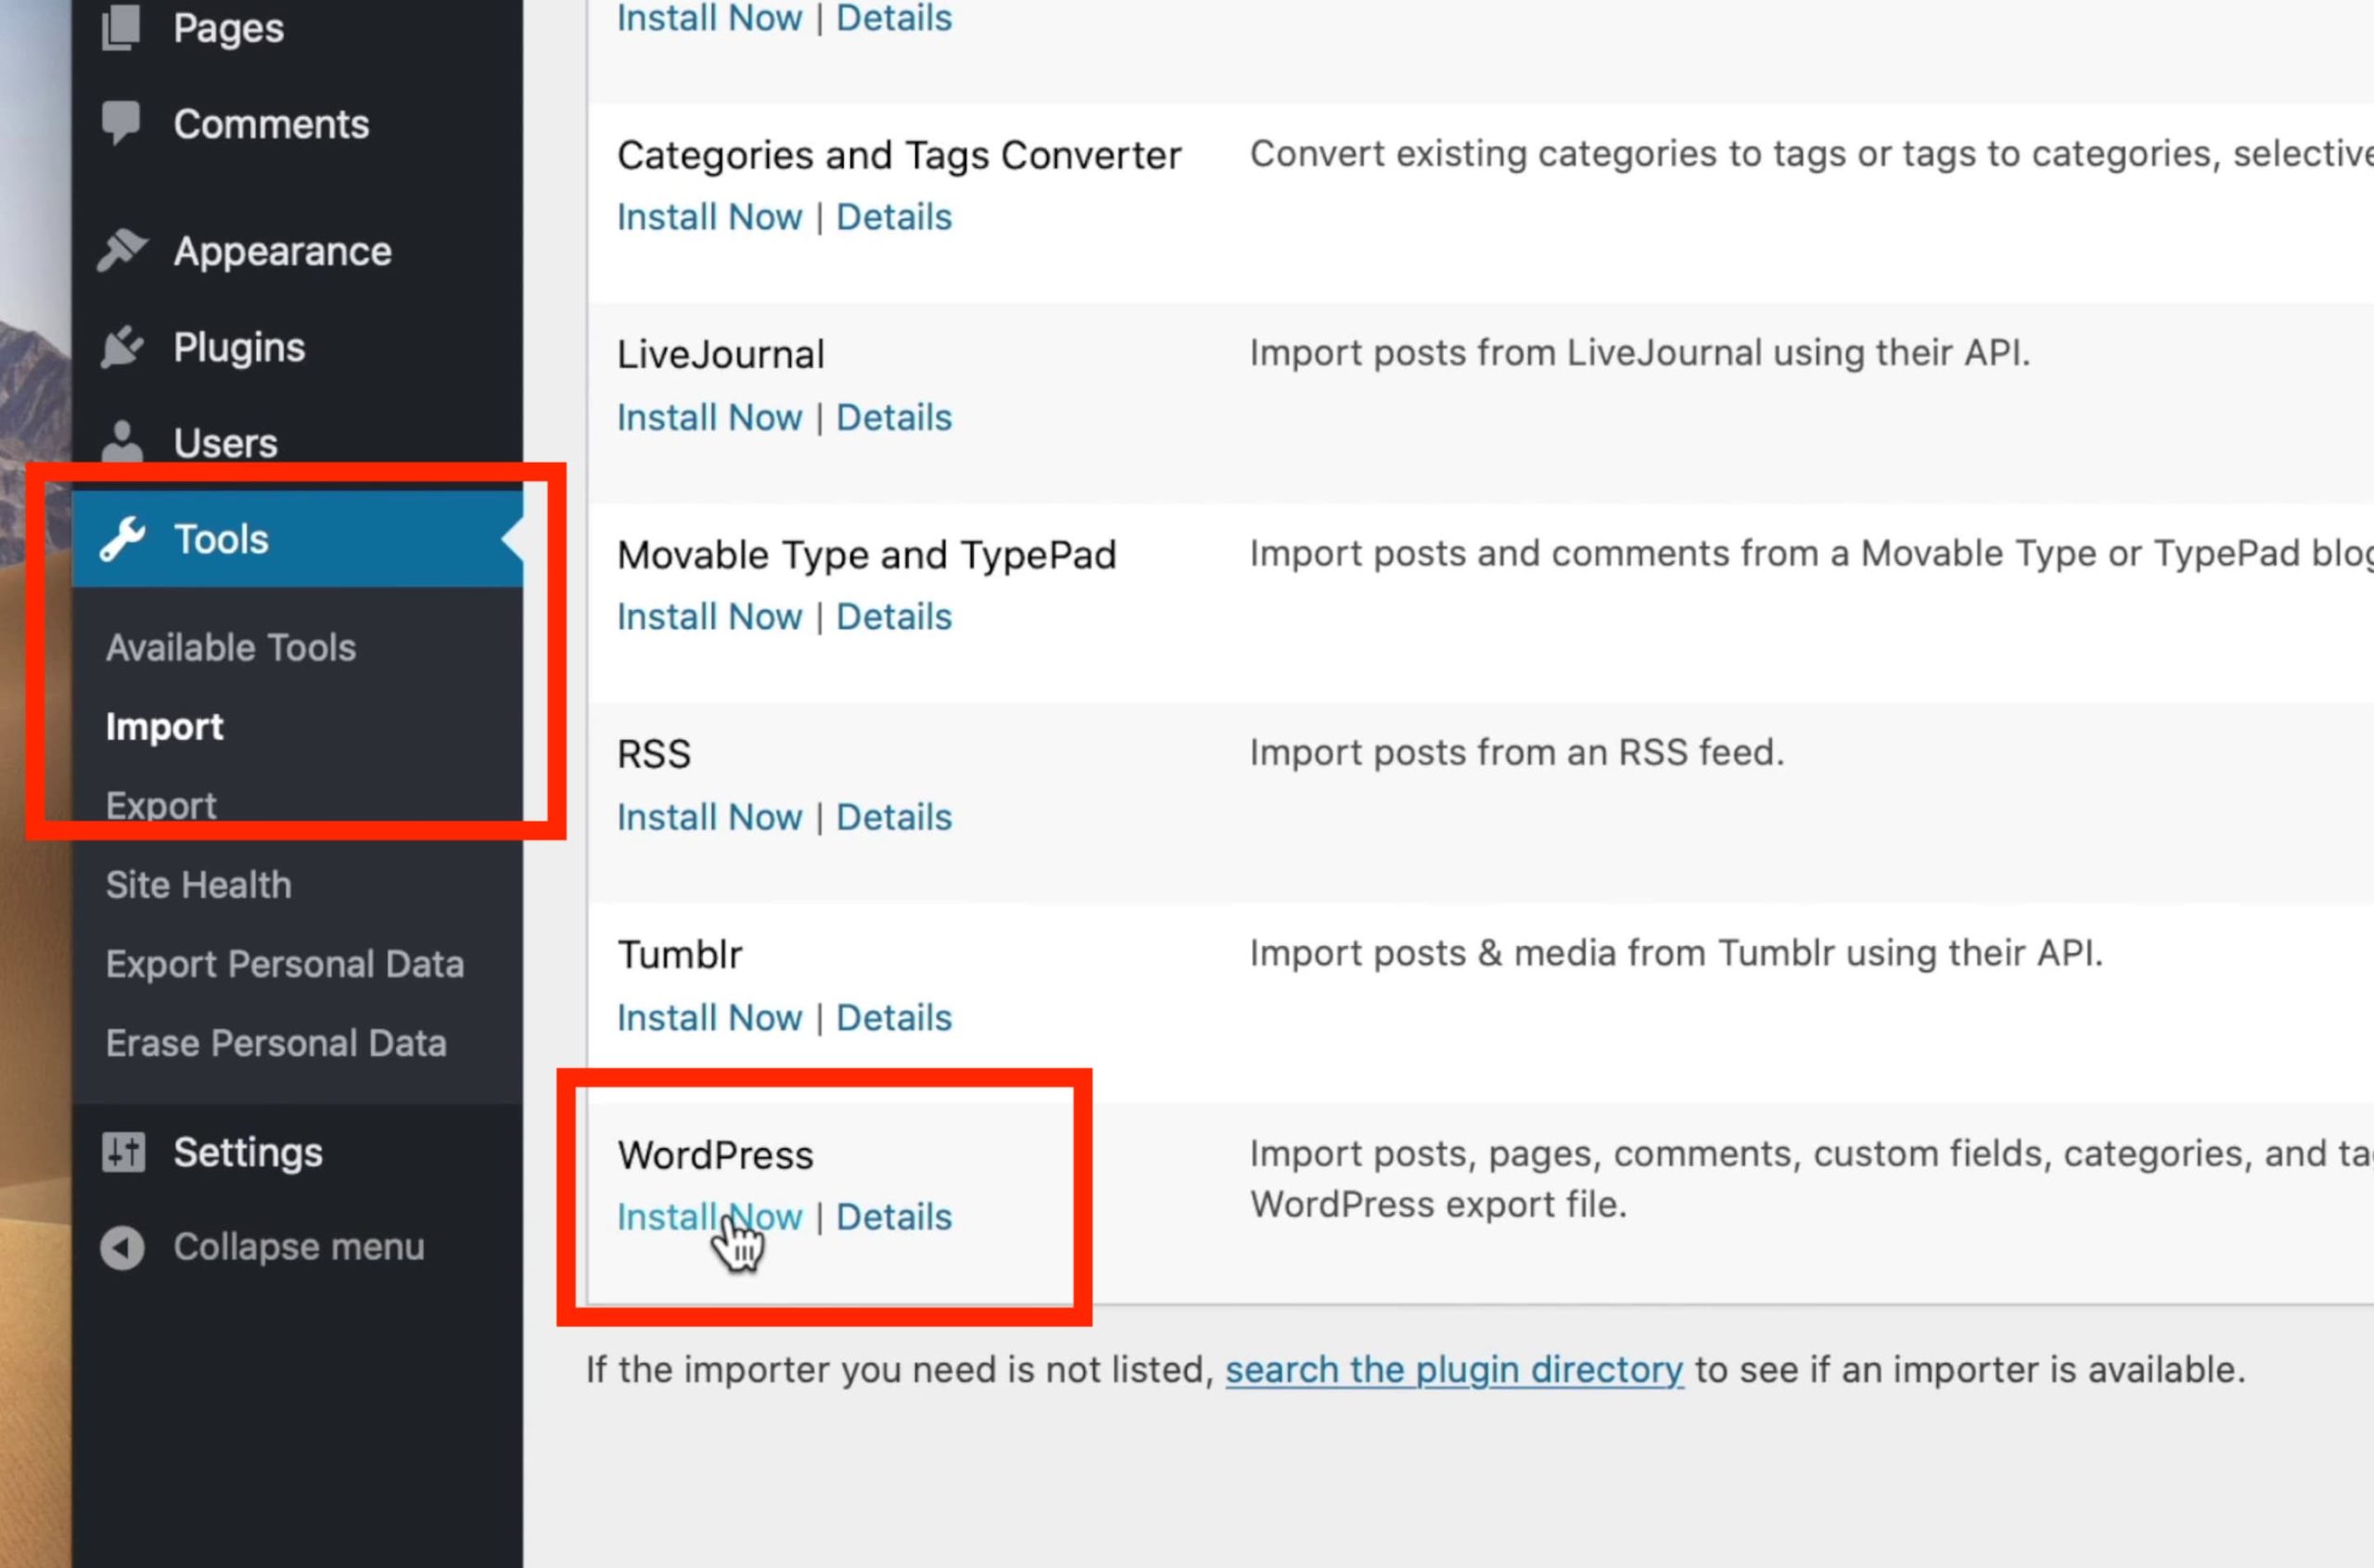
To import your WordPress.com content to your .org site, you’ll first of all have to login to your WordPress.org dashboard. Once there, head over to your menu and click on “Tools” then select “Import”.
You’ll have to first install the WordPress importer tool first:
Once installed, click the “Run Importer” tab. You will then get a prompt to upload your XML file.
Remember, the exported file with all your WordPress.com data is zipped, so you’ll have to unzip it first.
Next, click on the “Choose File” tab on the Import WordPress page (or similarly, drag your unzipped file to the “Choose File” tab.
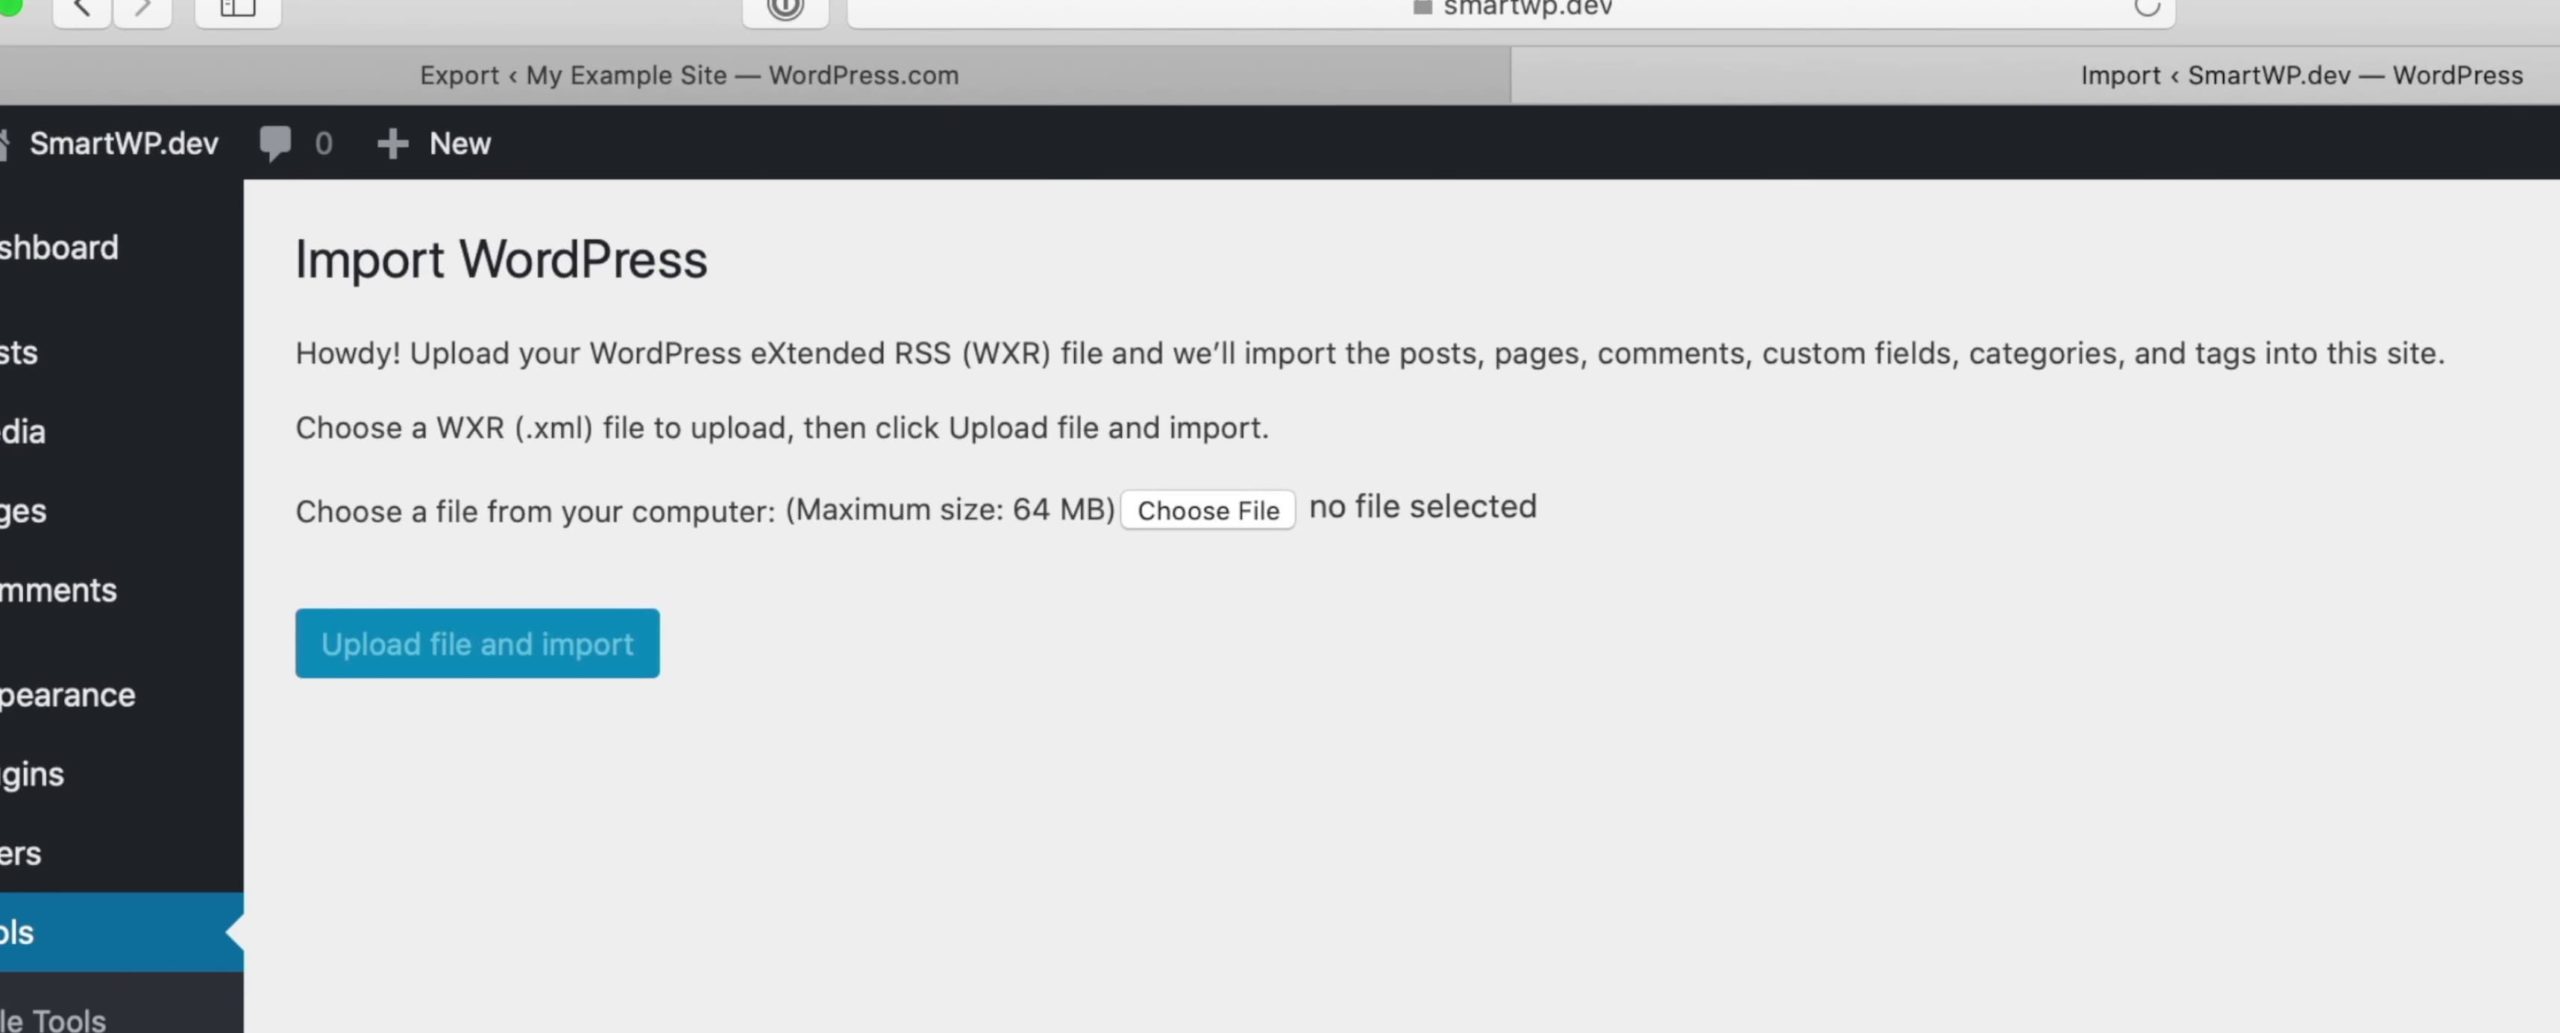
Once you’ve selected the unzipped XML folder with your WordPress.com data, click on the “Upload file and import” tab. This will take you to the next step of the process – assigning authors.
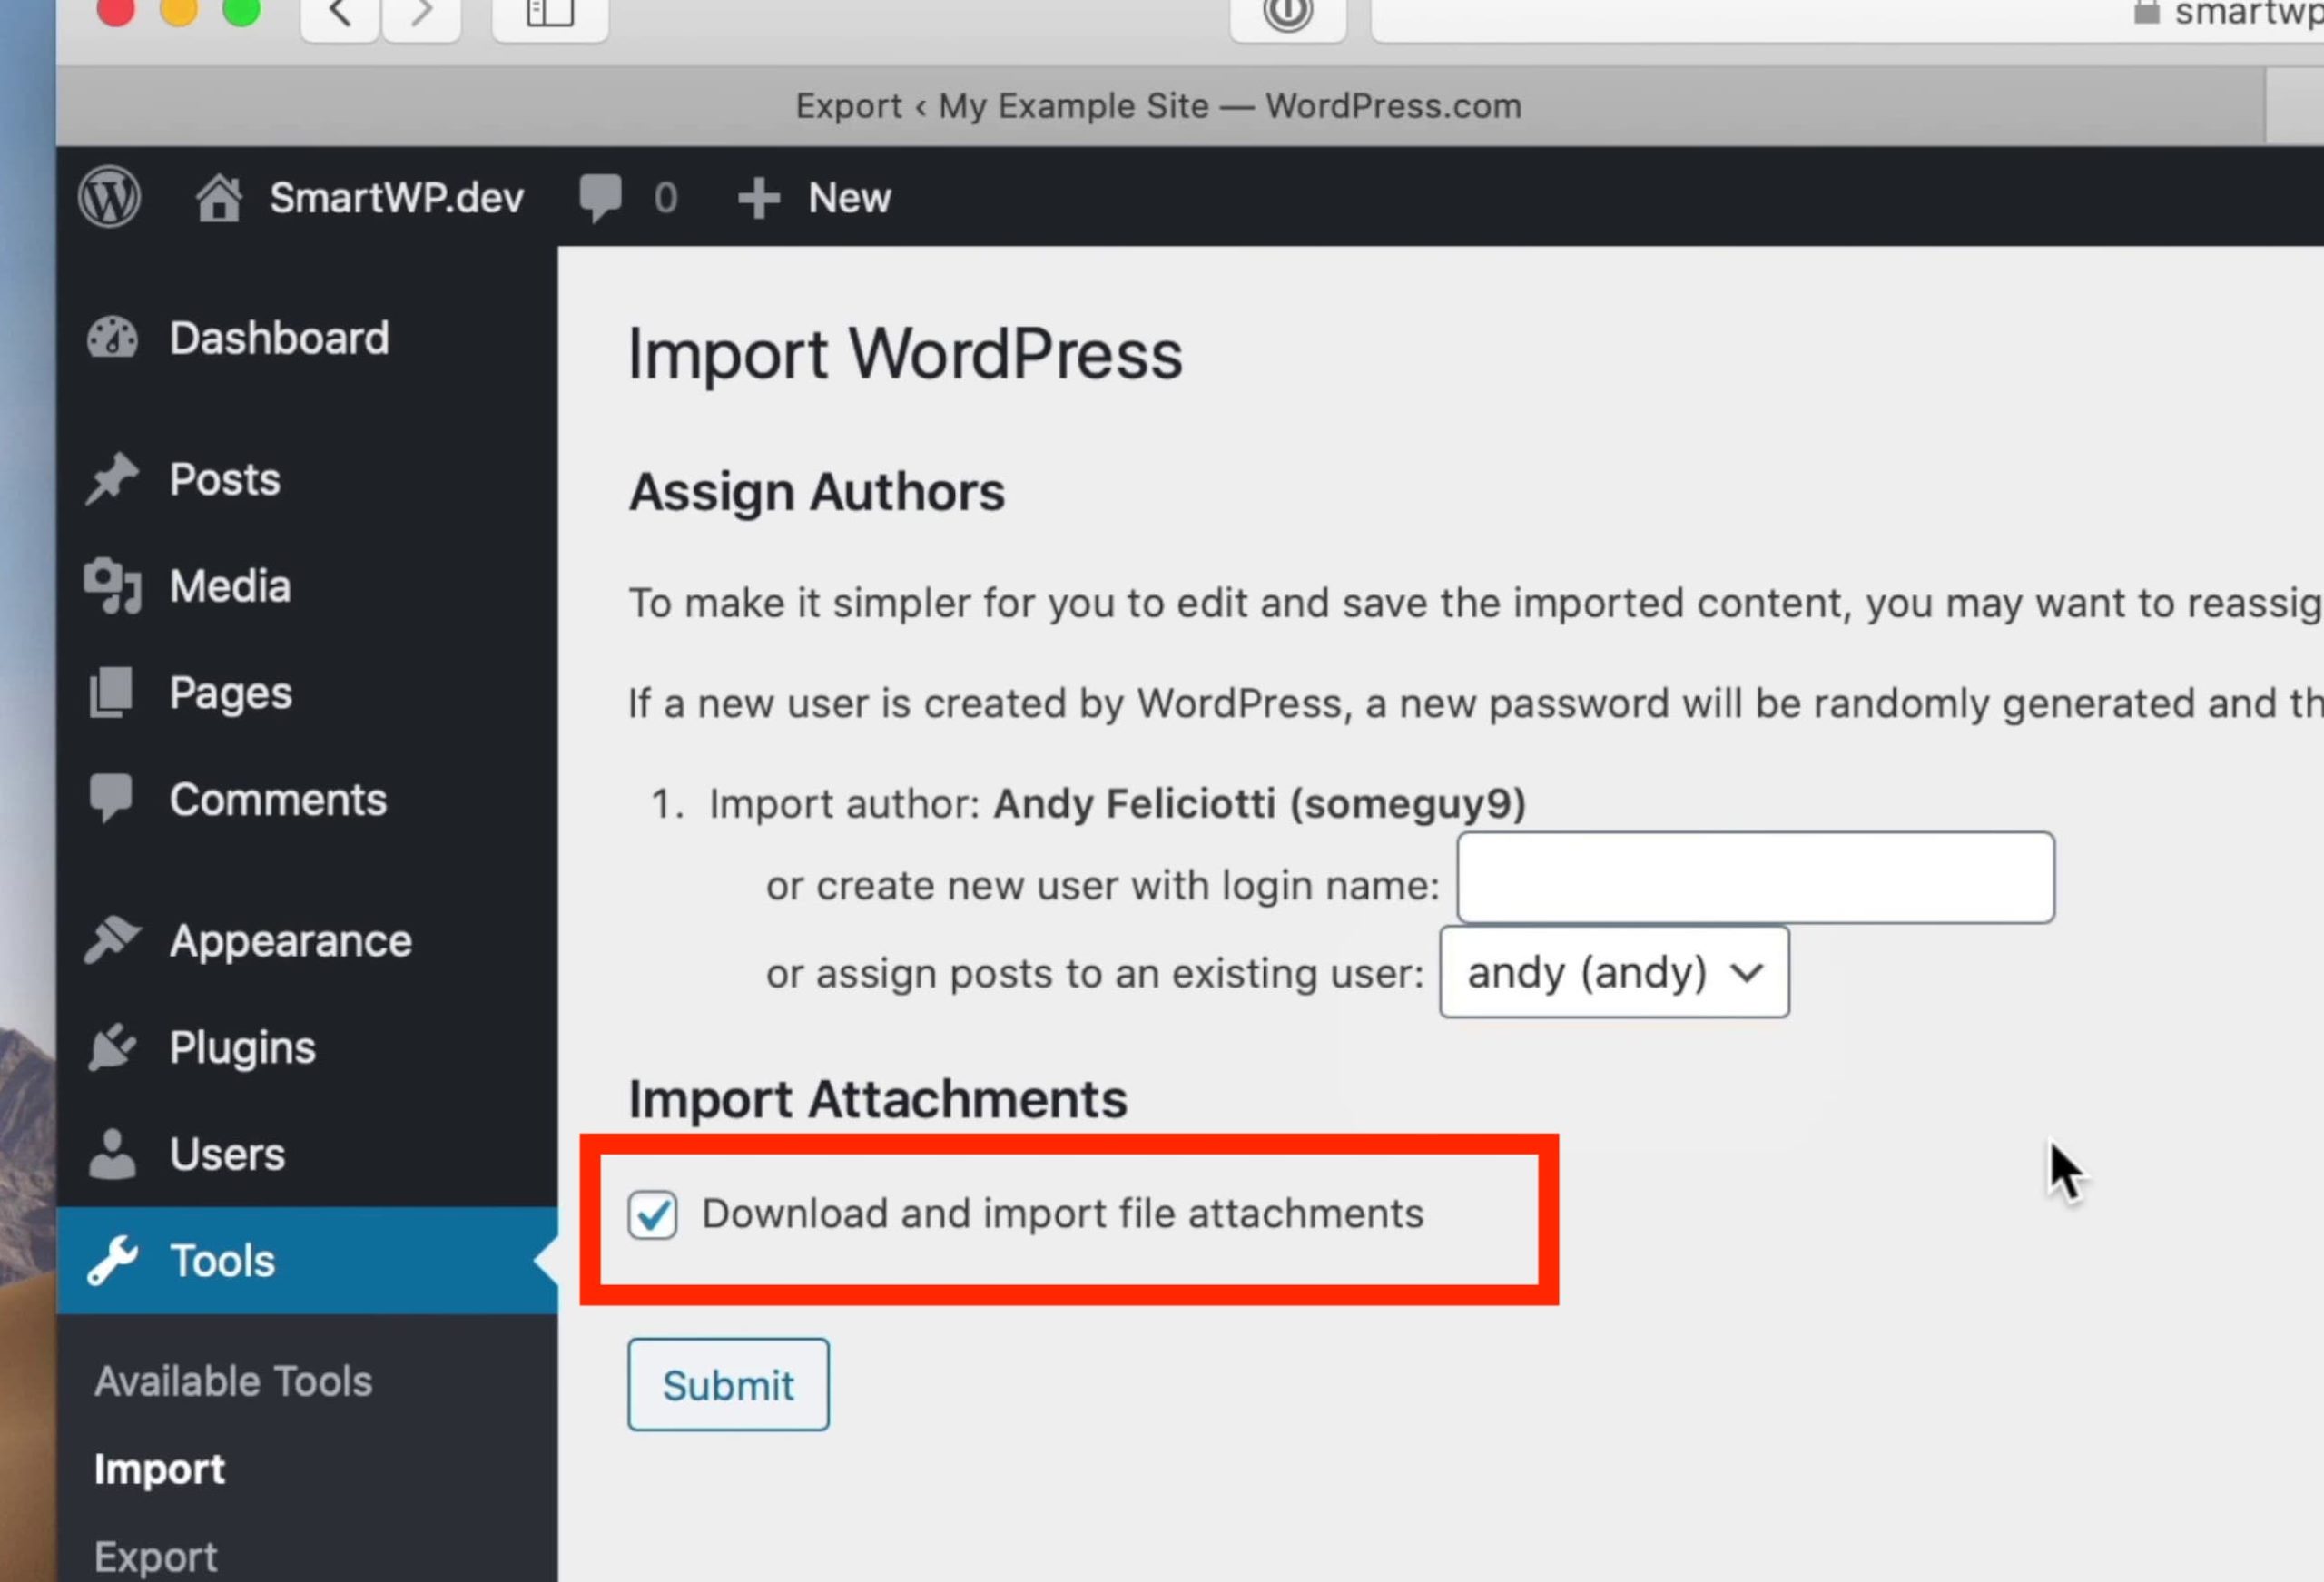
Before you assign your authors, make sure to check the “download and import file attachments” box. This is because this file contains all your posts and references to your media and you want all your content to live on your new site.
Now that this is done, you can focus on assigning authors to your new website. You can either stick to the default authors from your previous site or choose to assign new authors.
If you have multiple authors on your blog, you’ll have to type them all in one by one.
Once you’ve assigned authors and checked the “download and import file attachments” you can then click the “Submit” button. This will start the import process, which can take a couple of minutes depending on how big your file is.
Note: If you have a lot of media files and are familiar with file transfer protocol (FTP), you can go to your WordPress.com dashboard and export your media library.
This will give you a folder with all your media files that you can manually move over to your WordPress.org site using FTP.
The import sometimes appears to fail: the page hangs or times out, and the front of the site looks broken. Don’t panic. PHP timeouts on large imports are normal and don’t actually break anything.
Head back to your admin dashboard and check the Posts list. You’ll usually see that everything imported correctly. If posts are there, the import worked; the timeout was cosmetic.
3. Polish Up Your New WordPress.org Site
Now that your import is complete, head over to your homepage and check out your site. You’ll notice that all your menus from your previous site are now available. However, you will also notice that you’ll need to restructure a few things.
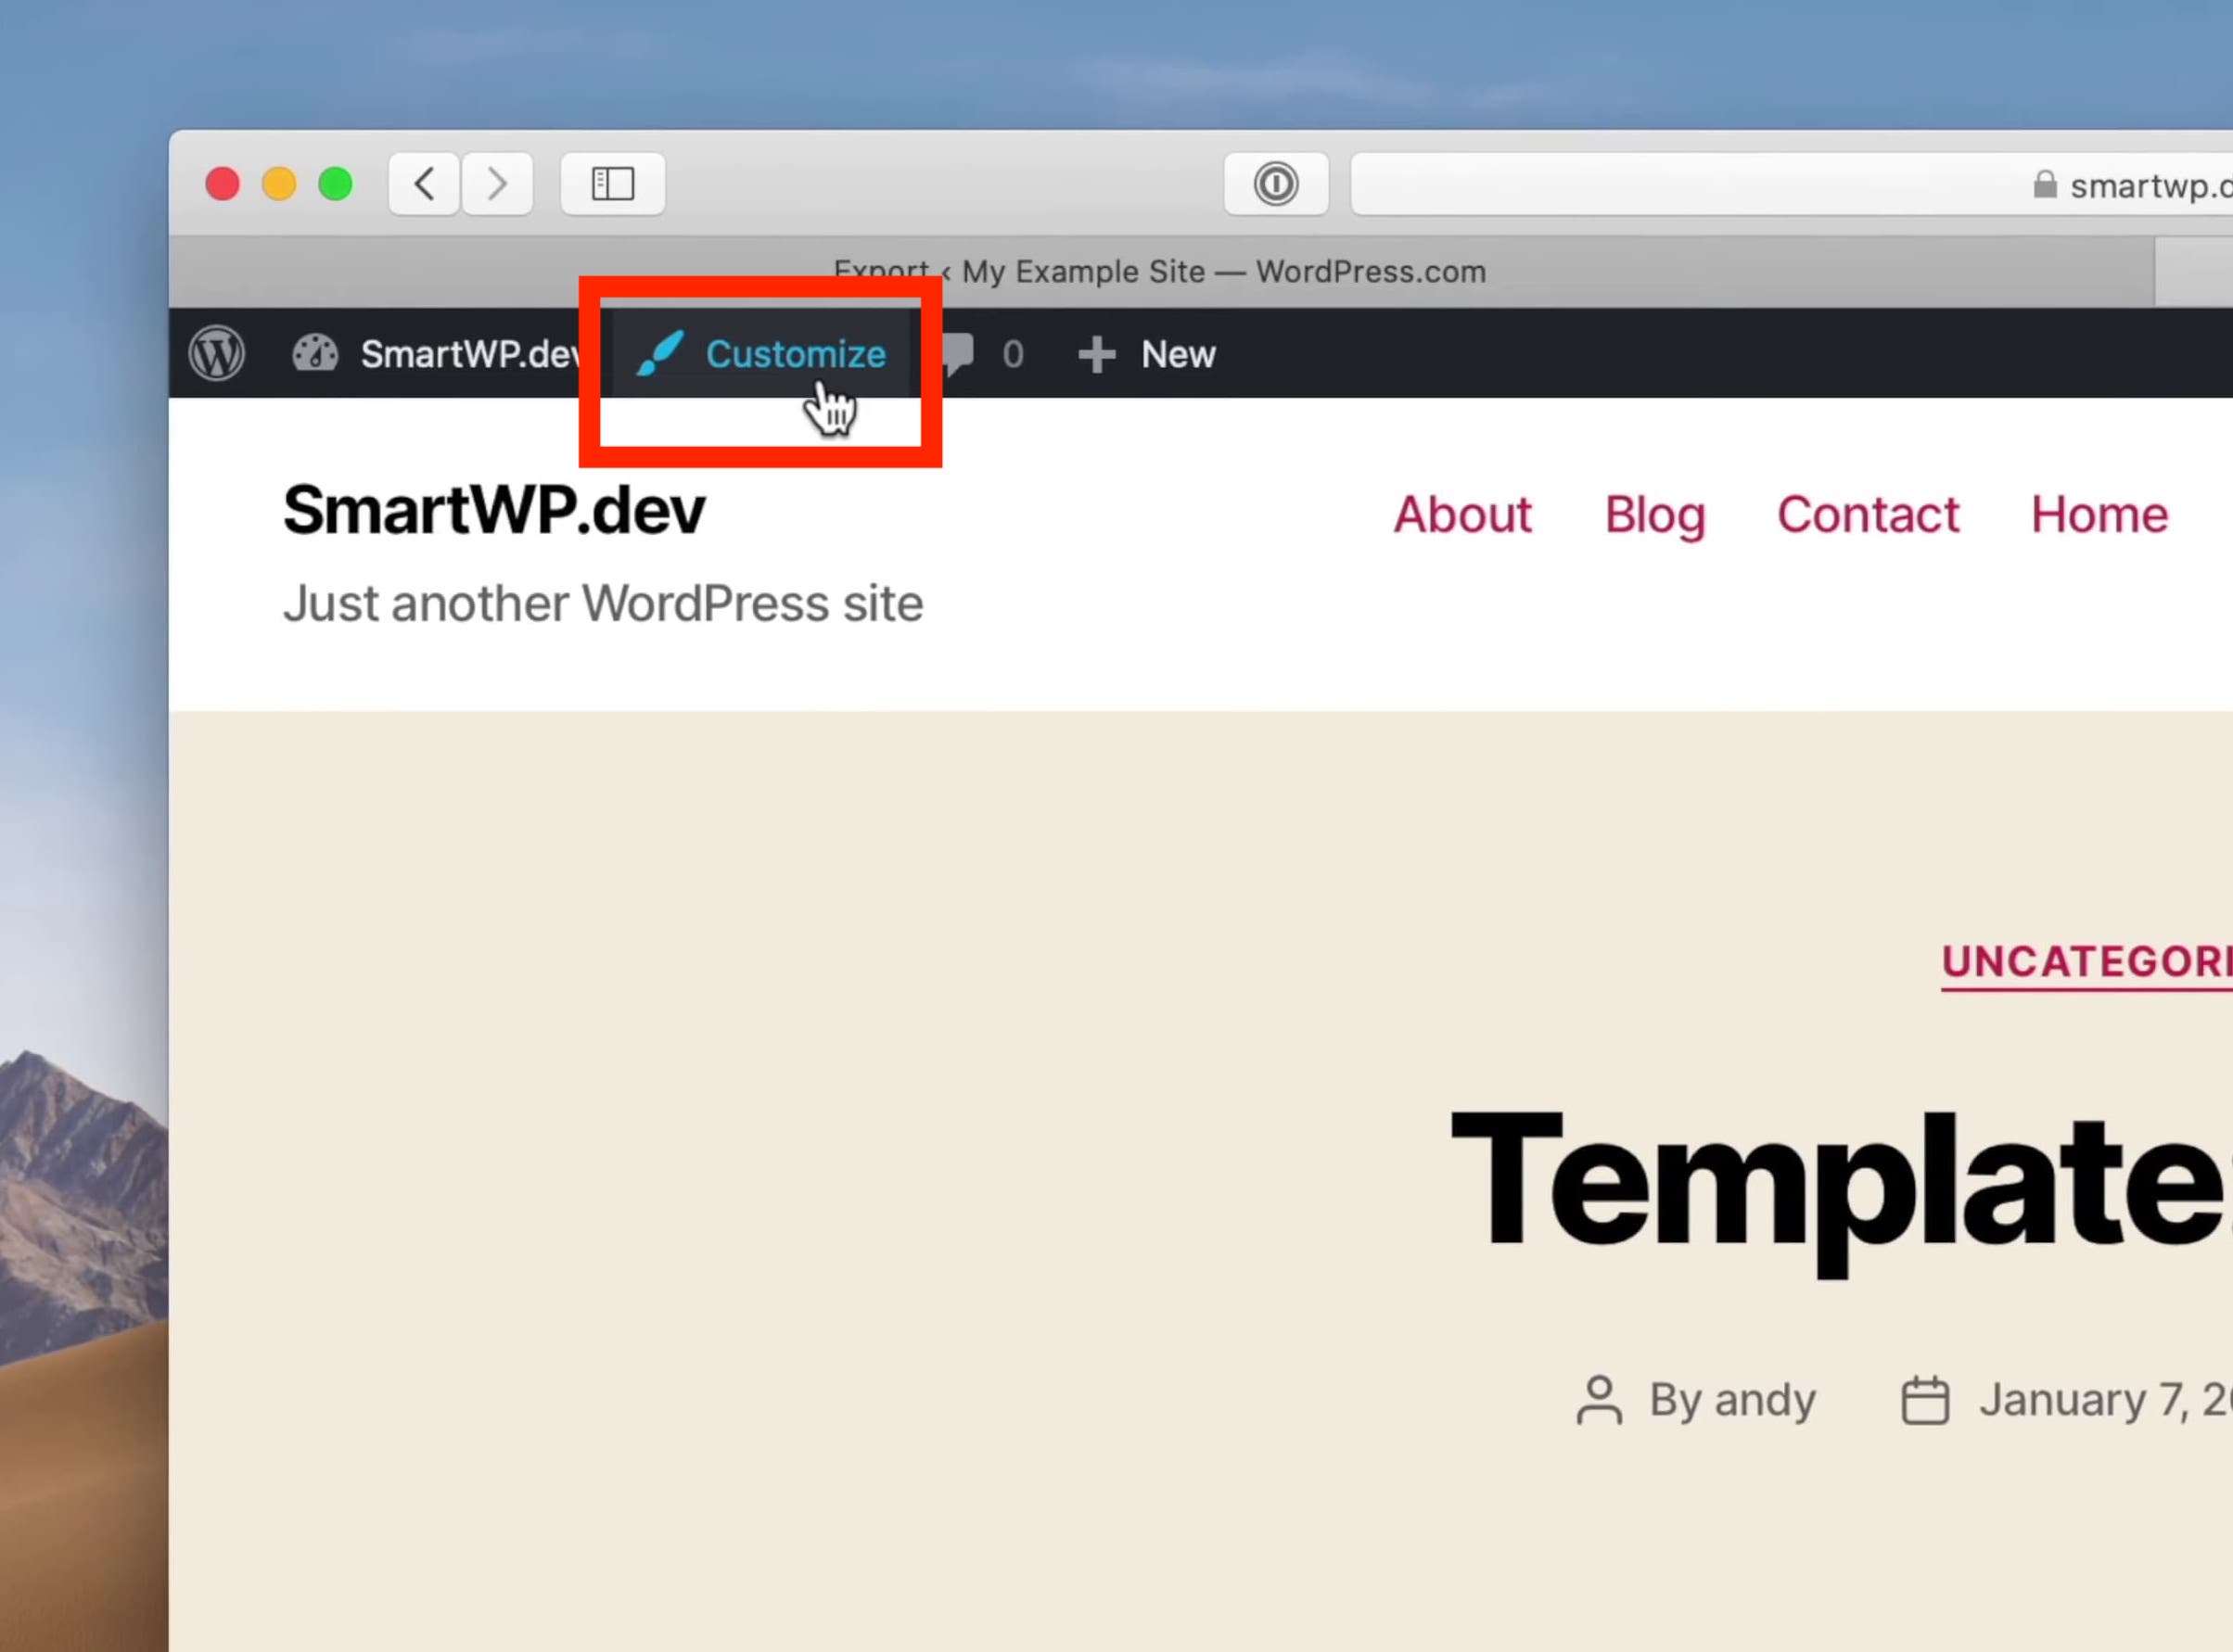
One of the first things you’ll need to restructure is your menu bar. To do this, simply click on “Customize” at the top of your website (as in the screenshot below):
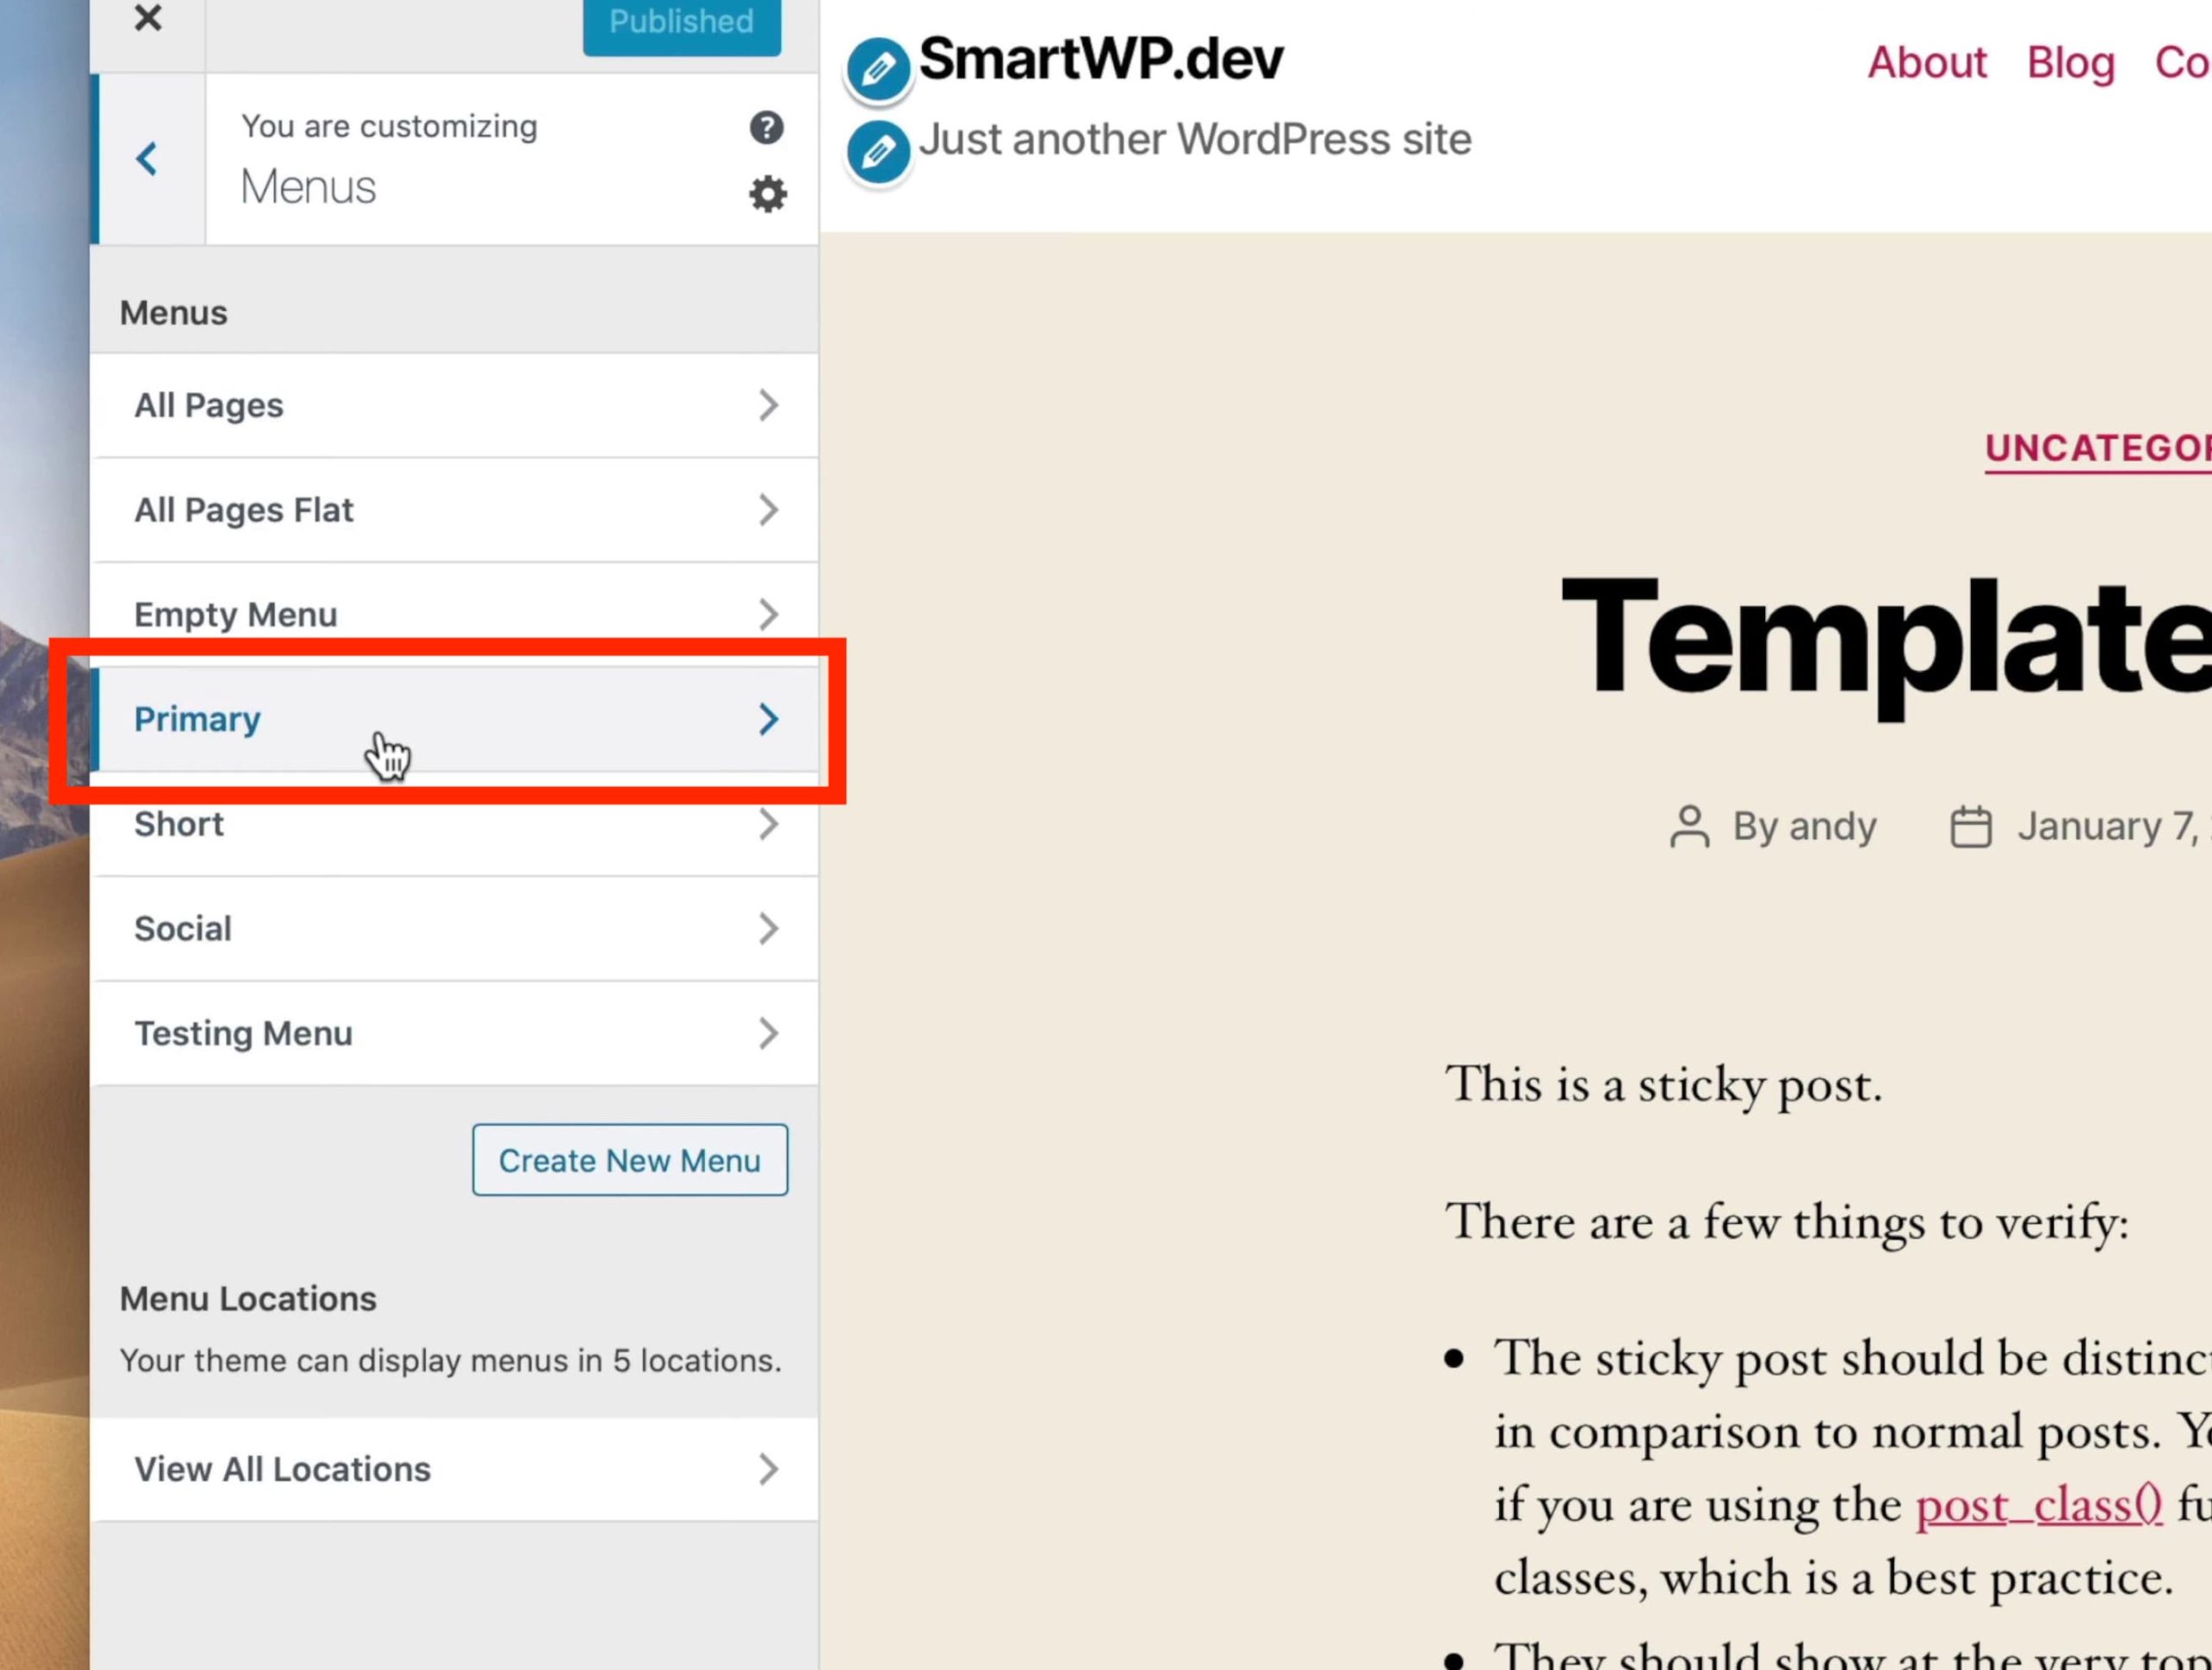
After clicking the “Customize” button and head over to the “Menu” section. From there, select “Primary” as that’s the menu you were using in the WordPress.com version of your site.
Because your new theme doesn’t know that the primary menu is the one it needs to use, you’ll have to set it manually. To do this, you’ll have to check the “desktop horizontal menu”:

Once you do this, your new site will look more production-ready.
Next, check the other pages on your new site, especially anything with multi-column layouts (a typical About page, for example). You’ll often see the formatting is off compared to the WordPress.com version.
That’s because WordPress.com ships with a Jetpack plugin called Layout Grid that’s not installed on a fresh WordPress.org site. Installing the same plugin on the new install restores the columned layouts.
To install the plugin, head over to your dashboard, go to plugins, and click on add new.
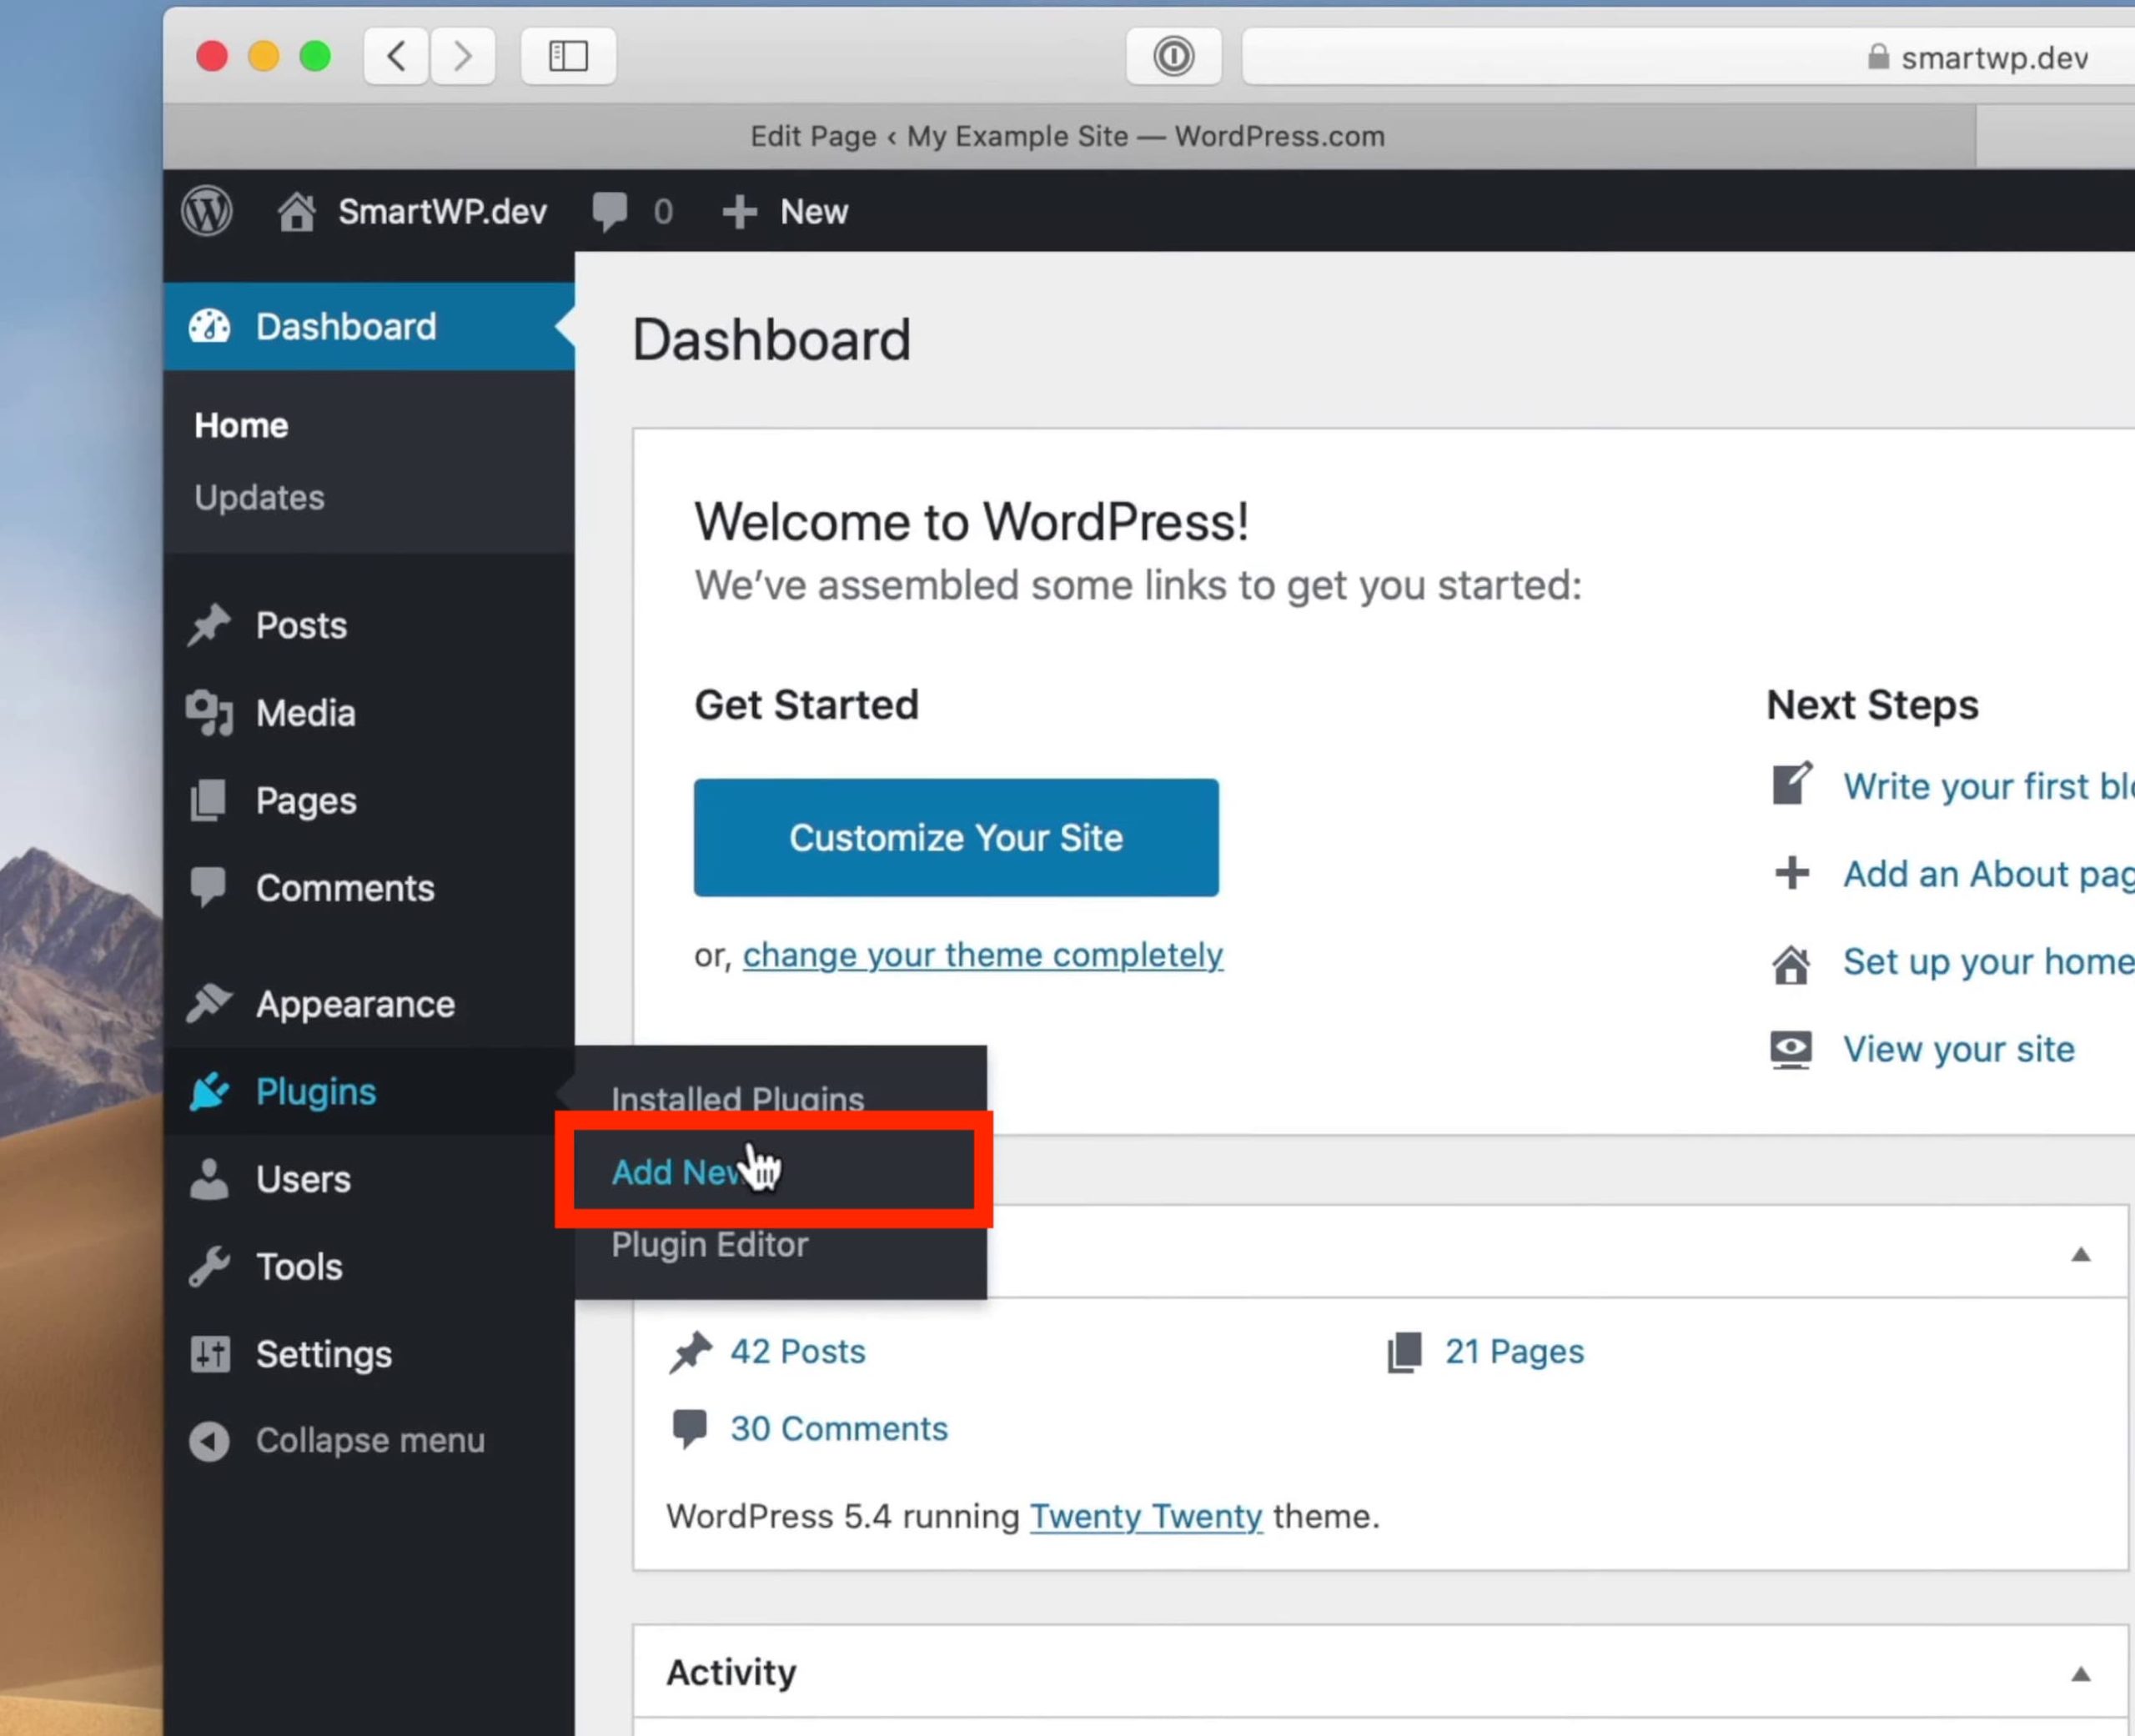
Type in Layout Grid in the search bar and click on Layout Grid Block by Automattic (WordPress’ parent company). Install and activate it.
Heading back to your About Page, you’ll notice that it has the correct formatting from your WordPress.com website. Go through all your pages and check for and fix any formatting errors you may find. At this stage, you can also add any customizations you want – something you couldn’t do on the WordPress.com version of your site.
4. Redirect Your WordPress.com Site to the .org Version
What happens to your WordPress.com site at this stage?
Nothing. It will still be live and people who will be looking for your site will probably find that version.
That’s why you’ll have to do a redirect on the WordPress.com site.
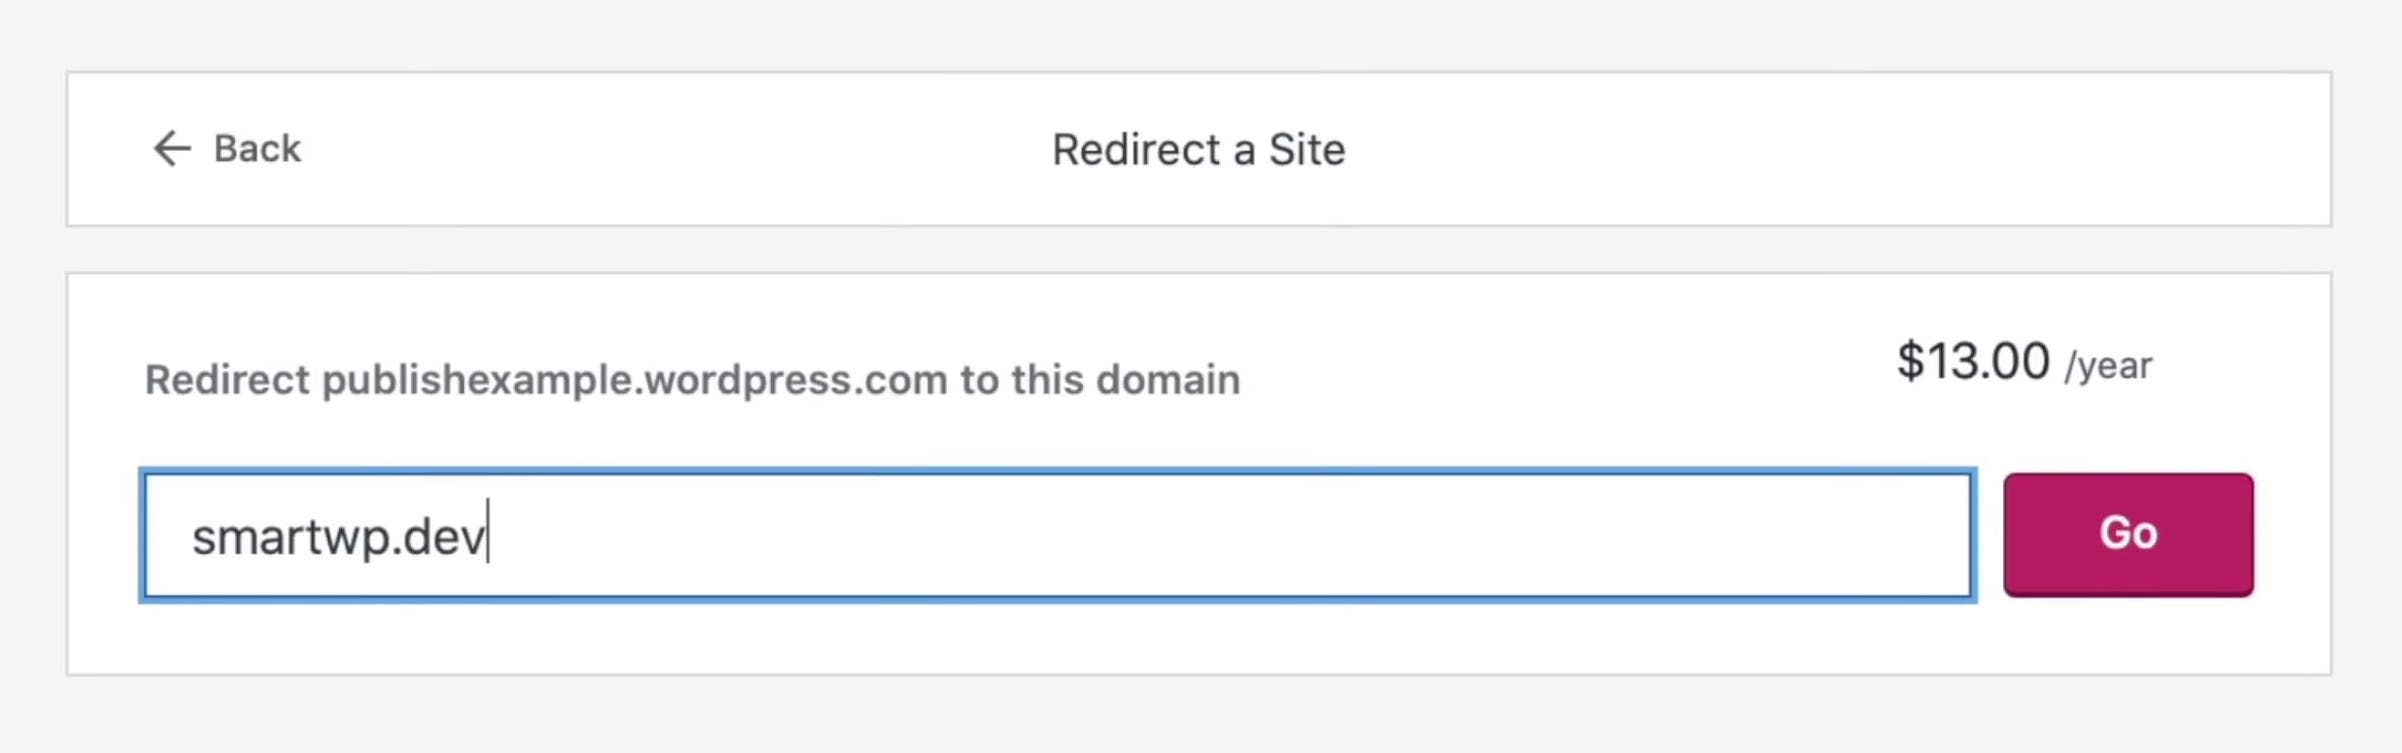
WordPress.com charges for site-level redirects, currently around $13 per year. It’s worth paying for at least the first year so search engines have time to index your new site and update their results.
Once Google and Bing have crawled the new site and your traffic is consistently landing on the .org version, you can let the redirect lapse.
So how do you redirect your WordPress.com site?
Head over to your WordPress.com admin dashboard and click on the “Manage” button and select settings. On the settings page, click on redirect.
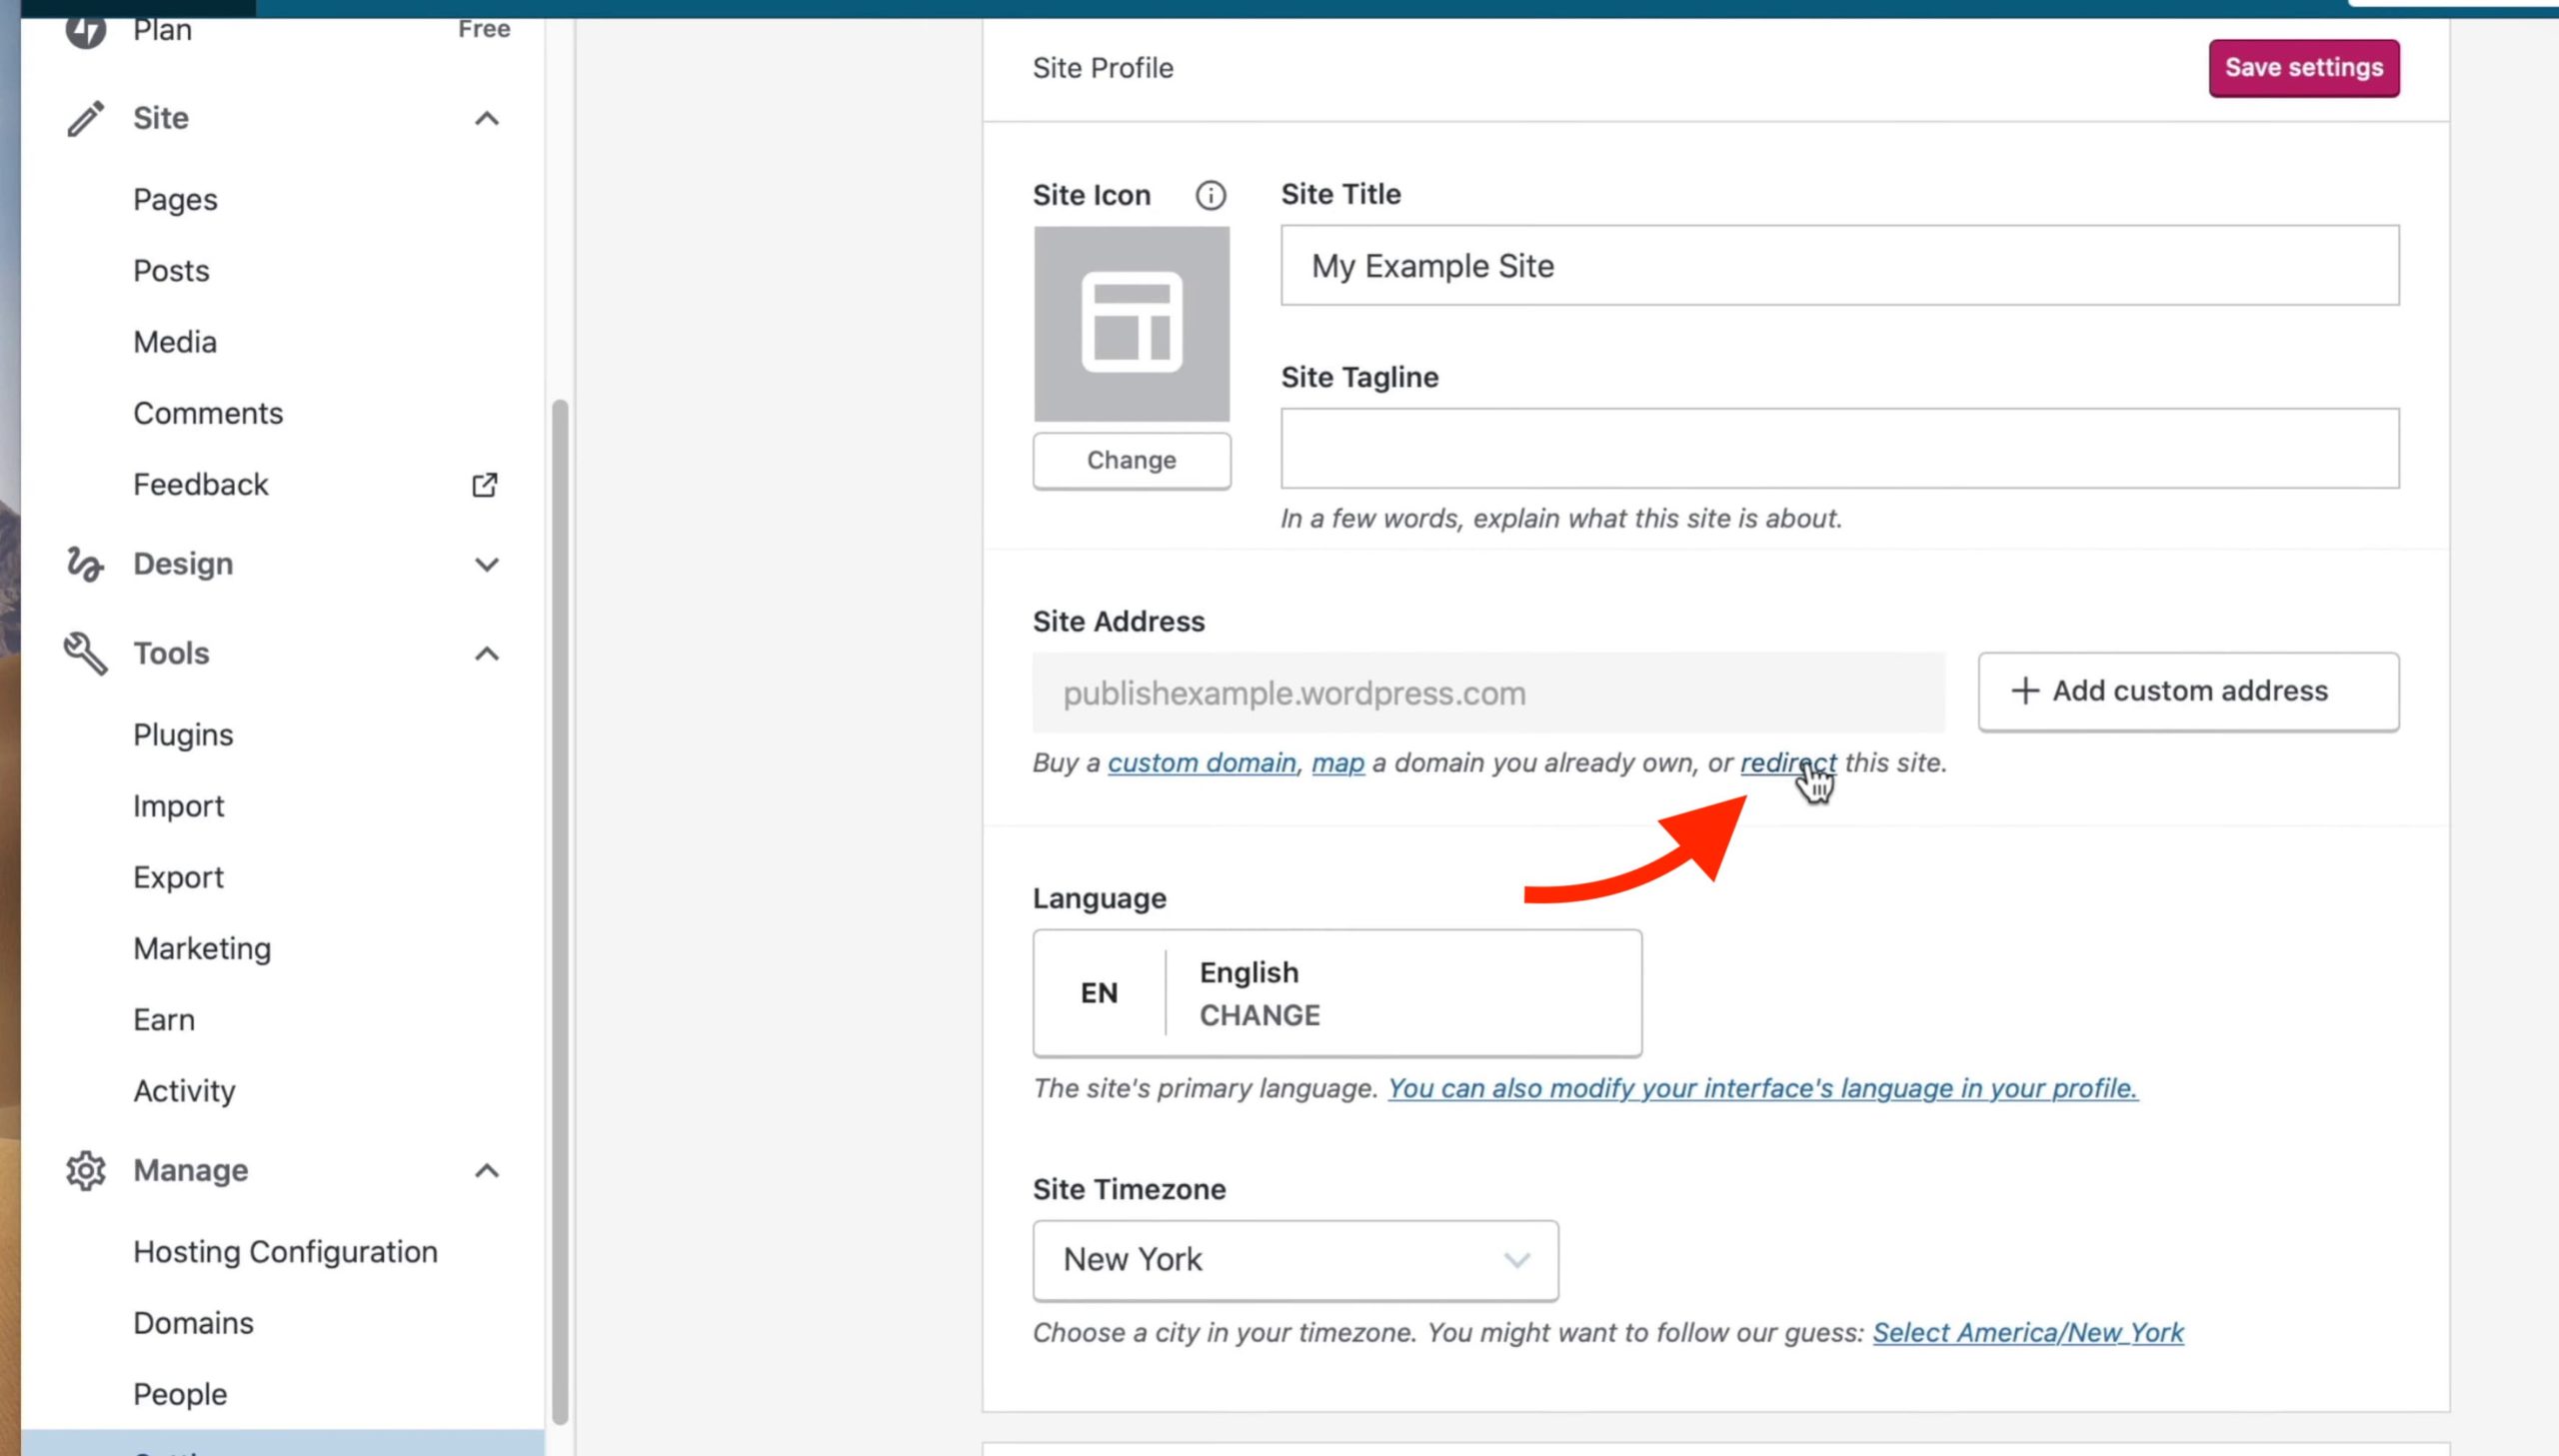
You will then be taken to a page where you fill in the address of the site you want to redirect to, which is your WordPress.org URL. This is also the page you purchase the redirect from.
And that’s it. You’ve successfully migrated your website from WordPress.com to WordPress.org.
Frequently Asked Questions
Will I lose my SEO rankings when I migrate?
Not if you set up the redirect properly. The WordPress.com site-level redirect (around $13/year) sends visitors and search engines from your old URLs to the new ones, which preserves most of your existing rankings. Without the redirect, you can lose months of SEO equity while Google figures out that the new site is the same content at a new home.
How long does the migration actually take?
For a small site (under 100 posts), the whole process takes about an hour: 15 minutes to export, 15 minutes to set up the new host, 15 minutes for the import, and 15 minutes to fix menus and formatting.
For larger sites (thousands of posts, large media libraries), the import step can take much longer, and you may run into PHP timeouts that force you to upload media manually via FTP.
Can I keep my .wordpress.com domain after migrating?
Yes, but you can’t point it at the new self-hosted site without paying for the redirect. If you originally had a free yoursite.wordpress.com address, you can leave that site up and use the paid redirect to forward visitors to your new yoursite.com URL. If you had a custom domain mapped through WordPress.com, you can transfer the domain to a registrar and point it at your new host directly.
What about my subscribers and followers?
WordPress.com’s built-in subscribers don’t transfer automatically. Before migrating, export your subscriber list (Users > Subscribers on WordPress.com), then import them into an email tool like Mailchimp, ConvertKit, or Kit on your new site. Jetpack’s Newsletter feature on the self-hosted side can also pick up where WordPress.com left off if you install Jetpack after migrating.
Do I need to migrate if I have a Business plan on WordPress.com?
The WordPress.com Business plan (and above) lets you install plugins and custom themes, so you already have most of the flexibility of self-hosted WordPress. The main reasons to still migrate are full server access, lower long-term cost (most managed WP hosts are cheaper than Business plan), and full ownership of the install. For many Business plan users, staying on WordPress.com is genuinely fine.
What’s the easiest way to handle the migration if I’m not technical?
Most managed WordPress hosts (Kinsta, WP Engine, Pressable) offer free migration assistance. You hand them your WordPress.com login or your export file, and they handle the import on their end. If you’re moving to a budget shared host like Bluehost or SiteGround, the manual export/import process described above is the most reliable path.
Wrapping Up
The four-step move (export, install, import, redirect) gives you everything WordPress.com offers plus the freedom to install any plugin, run any theme, and monetize however you want. The trickiest part is usually the formatting cleanup afterward, especially if your old site relied on the Layout Grid or Jetpack-specific blocks.
If you want to avoid the manual export/import, see our roundup of the best WordPress migration plugins. Picking a managed WordPress host with included migration is often the cleanest option for non-technical users.


8 Responses
This is very much helpful, I have successfully migrated my site from Wordpress.com to Wordpress.org. using this guide.
Thanks very much for this, I really appreciate.
Do have a nice day buddy.
Although am using wordpress.org on my blog and I have read such a post earlier, I want to appreciate you for your effort in making this blog a better place to learn WordPress.
Ryan Robinson you are such a wonderful who
is a set of master piece your article is super easy to understand
even on your blog i mean your personal one you are superb.
Great blog post.
There are many articles, like this one, to help with converting from WP.com to WP.org. However, there are none to help with the opposite – moving away from .org to .com, which some people could decide is better for their purpose.
hese headphones are so comfortable to wear. I can wear them for hours without any discomfort.
Great article! Your detailed guide on migrating from WordPress.com to WordPress.org is incredibly helpful. It’s perfect for anyone looking to take full control of their website. The step-by-step instructions make the process feel much less daunting. Keep up the excellent work!
This article answers my concerns of migrating from Wordpress.com to Wordpress.org. Great thanks!