
To clone a WordPress site, create a backup of its files and database with the free Duplicator plugin, upload the two files it gives you to the new location, and run its installer, which builds the copy and swaps in the new address throughout the database. If your host has a clone or staging tool, that does the same job in a few clicks, and developers can do it with a handful of WP-CLI commands.
We tested the Duplicator and WP-CLI methods on October 1, 2026, cloning a WordPress 7.1.2 site into an empty folder with Duplicator 5.0.5, the current version. Both copies came up with the same pages and the new URL in place of the old one, and the screenshots below come from that test.
- The free Duplicator plugin packs your site into two files, an archive and an installer. Upload both to the new location and open the installer in your browser.
- Duplicator 5 calls the copy a backup. Create it under Duplicator > Backups > Add New, then use Download > Both Files.
- The installer needs an empty database and swaps the old URL for the new one throughout the database, serialized data included.
- Log in through the installer’s Admin Login button so Duplicator deletes its installer files. Leaving them on the server is a security risk.
- With SSH access, WP-CLI does the same job: export the database, import it on the copy and run
wp search-replace. - On a test copy, tick Discourage search engines from indexing this site so it does not compete with the original.
Which method should you use?
| Method | Best for | What you need |
|---|---|---|
| Duplicator (free plugin) | A copy on another host, domain or folder | Admin access to the original site, a way to upload files (FTP, SFTP or a file manager) and an empty database at the new location |
| Your host’s clone or staging tool | A copy on the same hosting account | A host that offers one |
| WP-CLI | Developers, and clones you repeat often | SSH access to both locations |
If you are moving a site for good rather than copying it, the steps are nearly the same, and our roundup of WordPress migration plugins compares the alternatives to Duplicator.
Video tutorial
The video shows an older version of Duplicator. The written steps below match Duplicator 5.
How to clone a WordPress site with Duplicator
Duplicator is free on WordPress.org and has more than 1 million active installs. It packs your whole site, files and database, into an archive plus an installer script, and the installer rebuilds the site wherever you upload them, without installing WordPress there first.

Need scheduled backups? Duplicator Pro adds scheduled backups, cloud storage integrations, drag and drop imports and staging sites.
Step 1: Install Duplicator
In the dashboard of the site you want to copy, go to Plugins > Add Plugin, search for Duplicator, then click Install Now and Activate. Our guide to installing WordPress plugins covers the details.
Step 2: Create a backup
Go to Duplicator > Backups and click Add New. Duplicator 5 calls the copy a backup, where older versions called it a package.
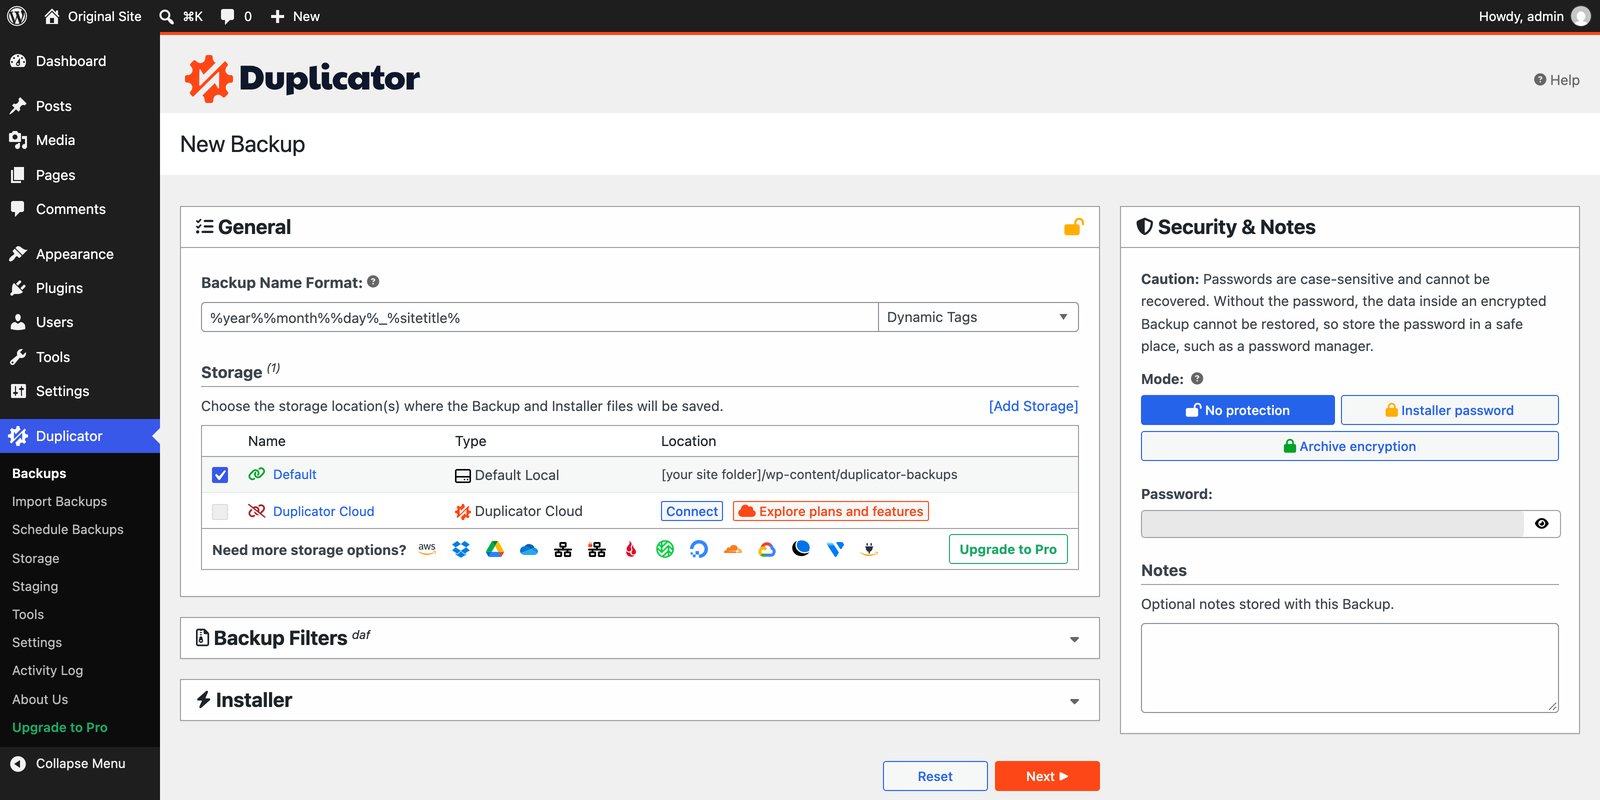
The defaults suit most sites: a name built from the date and site title, the Default local storage, and No protection. If the files will pass through anywhere you do not fully control, choose Installer password or Archive encryption here instead, because an unprotected archive lets anyone who gets it read your whole site and database.
Click Next. Duplicator scans the site and reports on your hosting setup, such as available memory and execution time. When it shows Scan Complete, click Create Backup and wait for the build to finish.
Step 3: Download both files
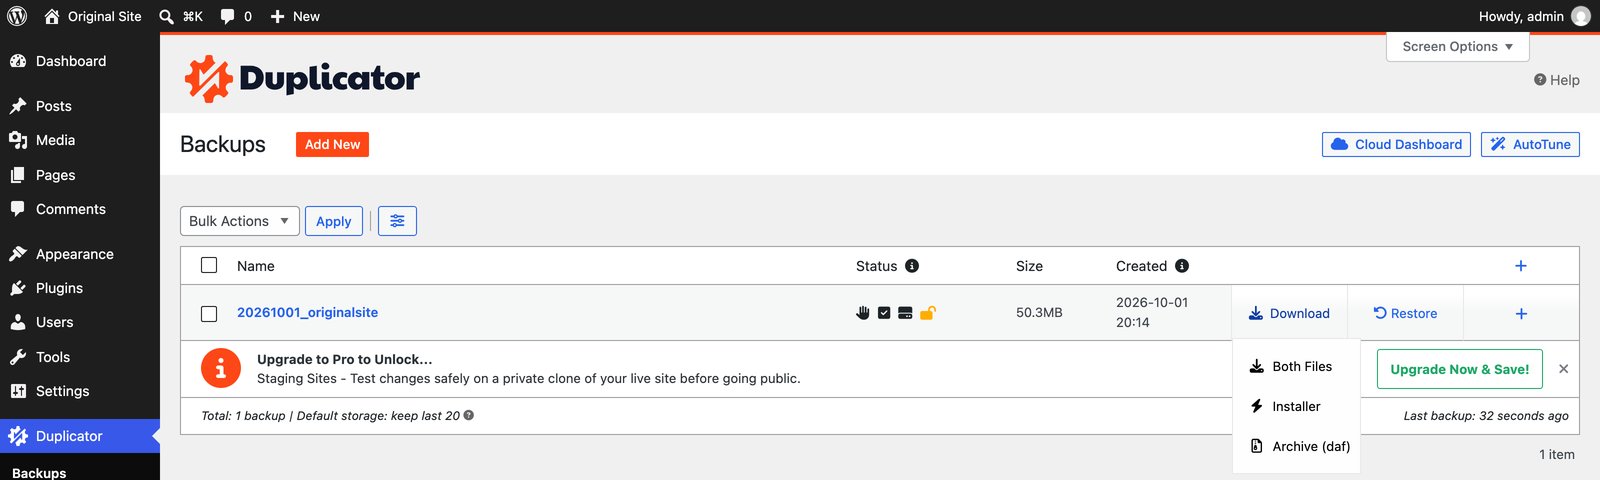
Back on the Backups list, open Download next to your backup and choose Both Files. You get two files:
- The archive, which holds your files and database. Duplicator 5 uses its own .daf format by default, and you can switch it to ZIP in Duplicator’s settings.
- The installer, a PHP file whose name starts with the backup name and a random string, such as
20261001_originalsite_[hash]_installer.php. The random part makes the installer hard to guess, and you can switch to a plaininstaller.phpin Duplicator’s settings.
Your browser may ask whether to let the site download multiple files. Allow it.
Step 4: Upload both files to the new location
Connect to the new host with an FTP or SFTP client such as FileZilla or Cyberduck, or open your host’s file manager, and go to the folder the new domain points to (often public_html). Upload the archive and the installer into that folder. If you have never used FTP, your host can give you the login details and tell you whether it uses FTP or SFTP.
The folder should be empty apart from placeholder files your host may add, such as a default index.html, which you can delete. You do not need to install WordPress there first, because the installer sets it up from the archive.
Step 5: Create an empty database
In your hosting control panel, create a new MySQL database and a database user, give the user all privileges on that database, and note the database name, username, password and host (usually localhost). On cPanel hosts this is under MySQL Databases, and other panels use similar names.
If your database user is allowed to create databases, the installer’s Create New Database action can make one for you instead.
Step 6: Run the installer
In your browser, go to your new address followed by the installer’s file name, for example https://newsite.com/20261001_originalsite_[hash]_installer.php. The installer opens on Step 1 of 2: Deployment.
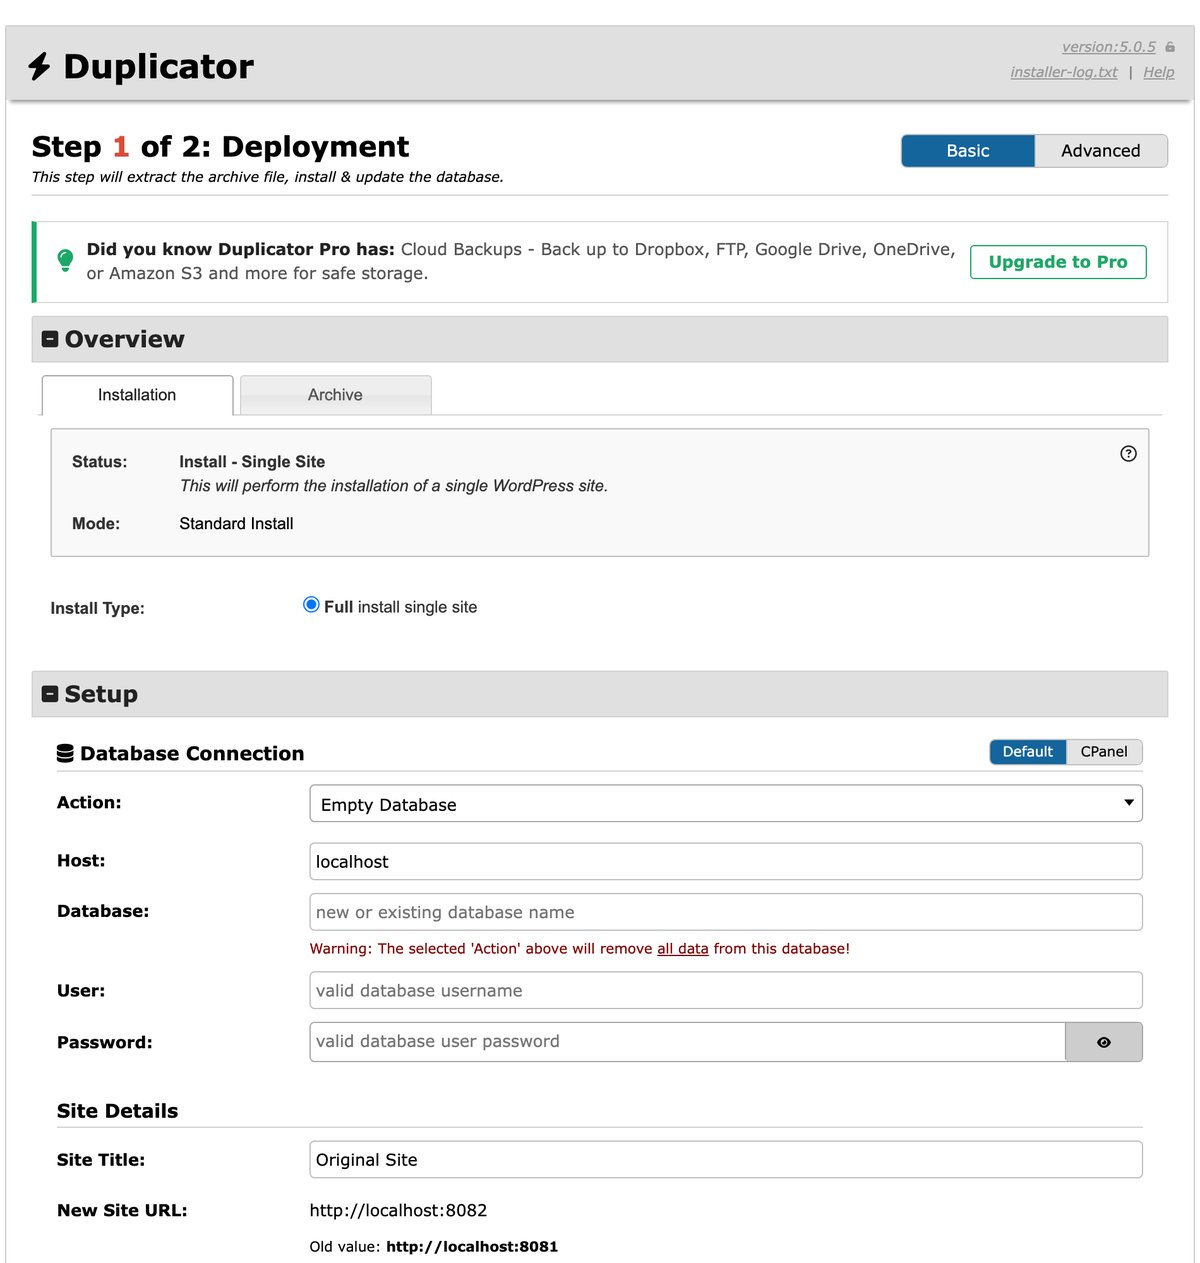
Enter the database host, name, user and password from step 5. Leave Action on Empty Database only if the database is new or holds nothing you need, because it removes all data from it. The installer fills in the New Site URL from the address you are visiting and shows the old one underneath, so check that it is right, then click Validate.
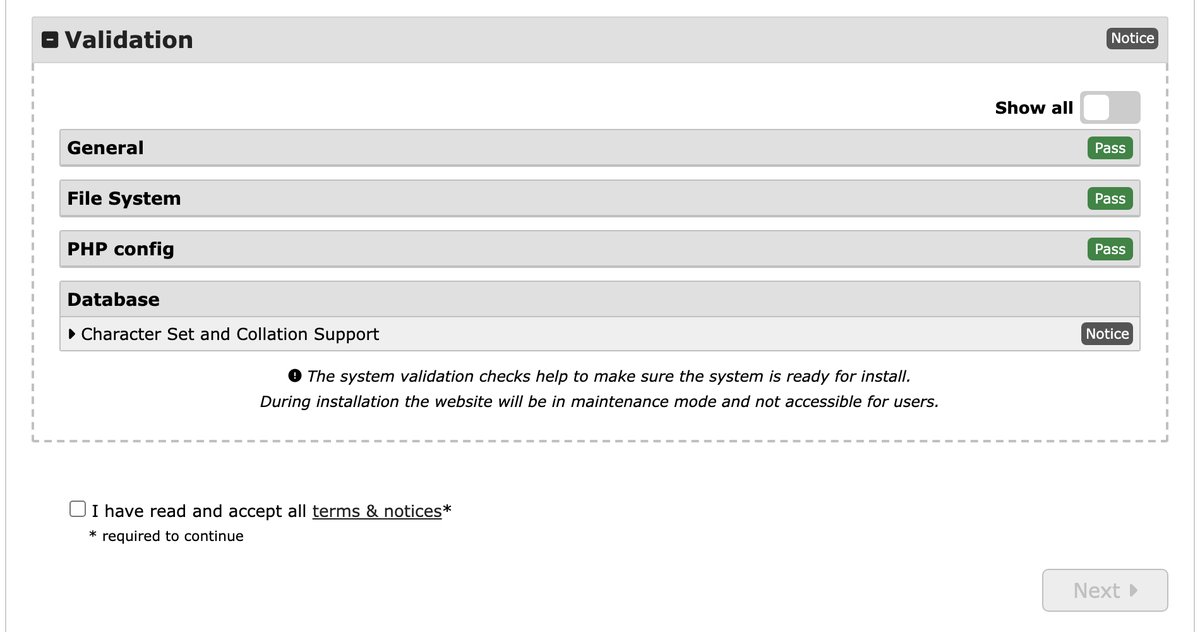
If the checks pass, or show only notices, tick I have read and accept all terms & notices, click Next and confirm. The installer extracts the files, imports the database and replaces the old URL with the new one, repairing serialized data as it goes.
Step 7: Log in so Duplicator can clean up
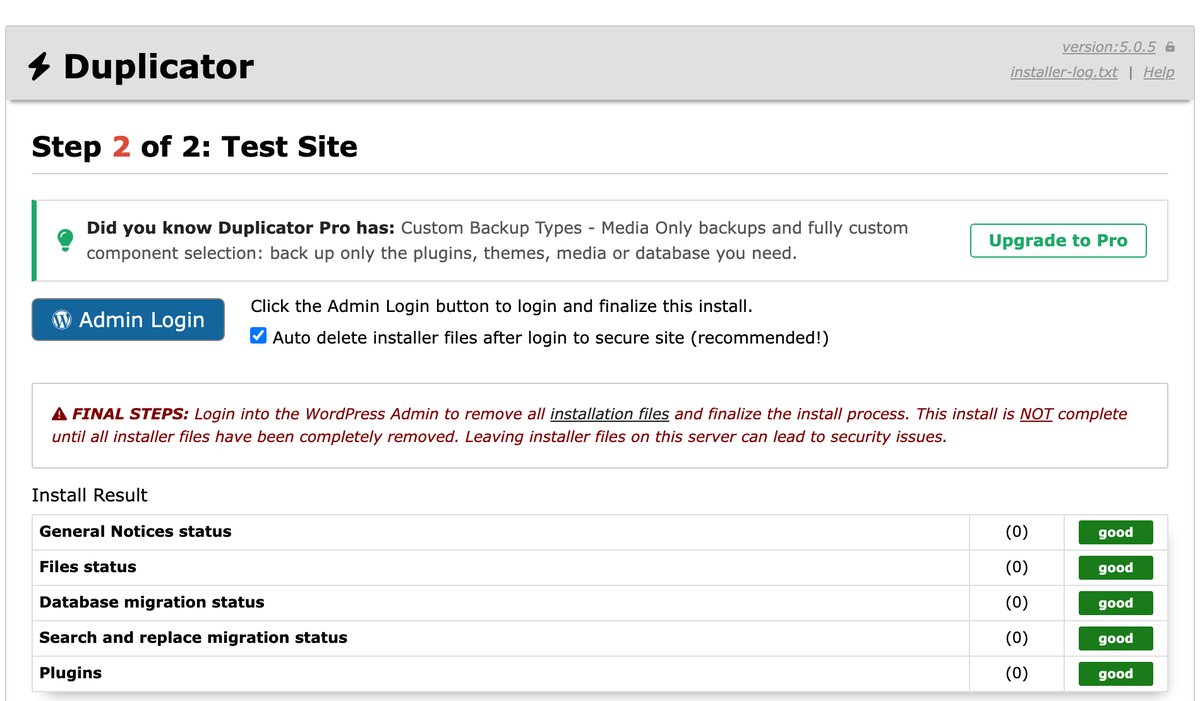
When you reach Step 2 of 2: Test Site, leave Auto delete installer files after login ticked and click Admin Login. Sign in with the same username and password as the original site, since the copy has the same users. Duplicator then confirms the migration and deletes the installer, the archive and its dup-installer folder from the site’s root.
Do not skip this step. Duplicator’s installer warns that the install is not complete until the installer files are removed, and that leaving them on the server can lead to security issues.
How to clone a site with your host’s tools
Many managed WordPress hosts include a clone or staging feature that copies your files and database and rewrites the URLs for you. On SiteGround, for example, the staging tool is under Site Tools > WordPress > Staging and creates the copy automatically. Look for Clone, Copy or Staging in your hosting dashboard, and see our guide to WordPress staging sites for how these copies work.
How to clone a WordPress site with WP-CLI
If you have SSH access, WP-CLI does the same job in a few commands. Here is the full sequence, with example paths and addresses to swap for your own:
# On the original site: export the database
wp db export site.sql

# Copy the files to the new location (here, a folder on the same server)
rsync -a /var/www/original/ /var/www/clone/

# On the clone: point wp-config.php at a new, empty database
wp config set DB_NAME clone_db
wp config set DB_USER clone_user
wp config set DB_PASSWORD 'your-database-password'

# Import the database, preview the URL swap, then run it
wp db import site.sql
wp search-replace 'https://example.com' 'https://staging.example.com' --skip-columns=guid --dry-run
wp search-replace 'https://example.com' 'https://staging.example.com' --skip-columns=guid
wp search-replace understands serialized data, which a plain find and replace in SQL would break, and --skip-columns=guid leaves post GUIDs alone, which the WordPress documentation says you should never change. The --dry-run pass shows how many replacements each table will get before anything changes.
After you clone: what to check
- If the copy is for testing, go to Settings > Reading on the clone and tick Discourage search engines from indexing this site, or run
wp option update blog_public 0. Password-protecting the copy is safer still. - Click through the copy and confirm that links and images use the new address. An old URL that survives is usually hard-coded in a custom field or page builder setting, and another search and replace fixes it.
- A copy of a store or membership site keeps the original’s email and payment settings, so turn off outgoing email and payment webhooks before you test anything that sends messages or takes orders.
- If you skipped the Admin Login step, delete the installer, the archive and the
dup-installerfolder from the site’s root yourself.
Can you clone someone else’s WordPress site?
Not with these tools. Duplicator, host tools and WP-CLI all need admin or server access, so they only copy sites you own or manage. Copying another site’s content or design without permission can also infringe its copyright.
What you can do is see how a site is built. Our WordPress plugin detector shows which theme and plugins a site uses, and themes in the WordPress.org directory must use GPL-compatible licenses, so you are free to install the same theme and build your own design on it.
Copying a single page instead
To copy one page or post rather than the whole site, use the editor’s Copy all blocks command or the free Yoast Duplicate Post plugin. Our guide to duplicating a page in WordPress walks through both.
Frequently asked questions
Can I clone a WordPress site for free?
Yes. Duplicator’s free version and WP-CLI cost nothing, and many hosts include a staging tool in their plans. Duplicator Pro adds conveniences such as scheduled backups and drag and drop imports, but you do not need it to clone a site.
Do I need to install WordPress before cloning a site to it?
Not with Duplicator. Upload the archive and the installer to an empty folder and the installer sets up WordPress from the archive. You only need an empty database and the database login details.
Can I clone a WordPress site to a new domain?
Yes. Point the domain at your new hosting, upload the Duplicator files there and run the installer from the new address. It detects the new URL and replaces the old one throughout the database, which in our test left no references to the original address on the copy.
What is the difference between cloning and migrating a WordPress site?
Cloning makes a copy and leaves the original running, while migrating moves the site and retires the old location. The steps are almost identical, so you can follow this guide for a migration and then redirect or take down the old site.
Will a cloned site hurt my SEO?
A public copy with the same content can be indexed alongside the original. Keep test copies out of search with the Discourage search engines setting or password protection, and delete copies you no longer need.
Is it safe to leave the Duplicator installer on my server?
No. Duplicator’s installer says the install is not complete until the installer files are removed, and that leaving them on the server can lead to security issues. Logging in through the installer’s Admin Login button with auto delete ticked removes them for you.




24 Responses
Thank you so much for the tip ! The plugin is perfect and suits my needs perfectly, great advice, great blog.
Glad it was helpful! you are very welcome
Dear Andy! The best tutorial I have ever found ! Thank you very much ! Thank you!
Hey Andy,
Thanks for this tutorial. I have followed all the steps, but when I go to open the website on the new domain I copied it to, I just get the 2020 theme.
Any idea where I went wrong or what step I might have missed?
Thanks,
Joanne
Hey Joanne, the issue most likely is the table prefix in the wp-config.php file. If you already had a WordPress site setup this will be set to the old prefix. Figure out the table prefix of your copied site and replace it in the wp-config.php file. I'll modify the instructions today as well to take this into account.
Hey Andy, I tried to follow each step, but I can not do login, because wp-login.php doesn’t exist in the directory, so when I checked the website directory, the structure is different, there are not wp-* directories, only index.php, wp-config..php. This is the message:
Not Found
The requested URL was not found on this server.
Apache/2.4.25 (Debian) Server at
This tutorial works like charm 🙂
Thanks Andy, you saved me hours!
all the best
Karesz
Hi Andy,
Im a newbie and its giving me a hell of time trying to set this up, can i pay you so you can clone a website and have it hosted.
Hello
I have used this tutorial five times before, worked like a charm. Absolutely Brilliant!
Now I need to do it for a sixth time and it bombs out. Nothing I do can fix it. I copied the files into my FTP then go to masterglam.co.za/installer.php- at step 1 the response I keep getting is this:
***
Internal Server Error
The server encountered an internal error or misconfiguration and was unable to complete your request.
Please contact the server administrator at [email protected] to inform them of the time this error occurred, and the actions you performed just before this error.
More information about this error may be available in the server error log.
Additionally, a 500 Internal Server Error error was encountered while trying to use an ErrorDocument to handle the request. ***
The people from the server just keep telling me to retry. This message keep popping up though.
Any advice will truly save my life! Pretty Please.
Thanks, Jóni
Same for me
I came, I saw, I Conqered
Damn you’re good!
Question: Does this backup the settings and customizations of the plugins as well?
Nice Tutorial Admin
Thanks for sharing 🙂
Amazing tutorial 🙂
Thanks Andy, you saved me hours too!
all the best
TourUSA
It always gives me hives when I have to deal with mysql and databases, but I followed your directions and I *thought* I had it, but Siteground never gave me a password for the new user. So I’m stuck.
I’d recommend emailing Siteground! Hopefully they can get you the login you need.
Thank you for the great article. I was able to successfully clone my WordPress site following your guide.
Great guide, thank you so much!
Thank you for this detailed article I also wanted to learn about cloning of wordpress websites
Thank so much for this detailed article I also wanted to learn about cloning of wordpress websites
Another happy user here! Thanks for the great tutorial!
Terimakasih mas untuk tutornya sangat membantu ^_^
Learn How to Clone a WordPress Site in Minutes with this step-by-step guide, perfect for building a CarX Street Drive-themed site. Quickly duplicate your setup to test new designs, showcase racing stats, or share gameplay tips. Accelerate your site's performance like a finely-tuned street racing machine!