The fastest way to add custom CSS to WordPress depends on which kind of theme you’re running. On a block theme (Twenty Twenty-Four, Twenty Twenty-Five), go to Appearance → Editor → Styles → Additional CSS. On a classic theme, use Appearance → Customize → Additional CSS. Both give you a live preview, both ship with WordPress, and both keep your CSS safe across theme updates.
Below is what a simple custom CSS rule looks like. Drop this into either editor, hit Publish or Save, and your h1 headings turn navy:
h1 {
    color: #1e3a8a;
    font-weight: 700;
}
Below I’ll walk through all 5 places you can add custom CSS in WordPress (including a child theme for bigger projects), how to find the exact selector for the element you want to change using browser dev tools, common reasons your CSS isn’t taking effect, and a FAQ for when things still aren’t working.
Quick aside: if you’re picking colors for your custom CSS, I built ColorKit as a designer-friendly palette generator with conversion, shades, and contrast tools. Beats guessing hex codes.
- The fastest way to add custom CSS depends on your theme: block themes use the Site Editor, classic themes use the Customizer.
- For small tweaks, Appearance > Additional CSS (or the Simple Custom CSS plugin) is plenty.
- For bigger projects, put CSS in a child theme’s style.css so it survives theme updates.
- If your CSS isn’t applying, it’s usually a specificity problem or caching; use browser DevTools to find the right selector.
Video tutorial
No time for the full article? Quick video walkthrough of the two built-in methods:
Method 1: Block theme (Site Editor)
For any theme built for full site editing (Twenty Twenty-Four, Twenty Twenty-Five, Kadence Blocks-based themes, anything where you see Editor under Appearance in WP admin).
- Go to Appearance → Editor.
- Click the Styles icon (half-filled circle) in the top-right toolbar.
- Open the three-dot menu on the Styles panel and choose Additional CSS.
- Paste your CSS into the editor. Changes preview live in the canvas.
- Click Save.
The CSS you add here survives theme updates and is scoped to your site (not the parent theme). If you switch to a different theme later, the CSS stays with your database, not with the theme files.
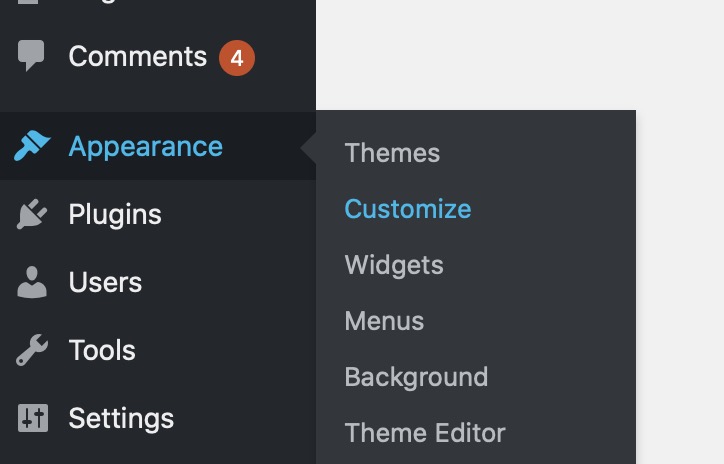
Method 2: Classic theme (Customizer)
For classic themes (Astra, GeneratePress, Kadence, OceanWP, Twenty Twenty-One, or anything where you see Customize under Appearance instead of Editor).
- Go to Appearance → Customize.
- Scroll to the bottom of the left panel and click Additional CSS.
- Paste your CSS. The preview pane updates as you type.
- Click Publish at the top, or use the gear icon next to Publish to schedule the change for later.

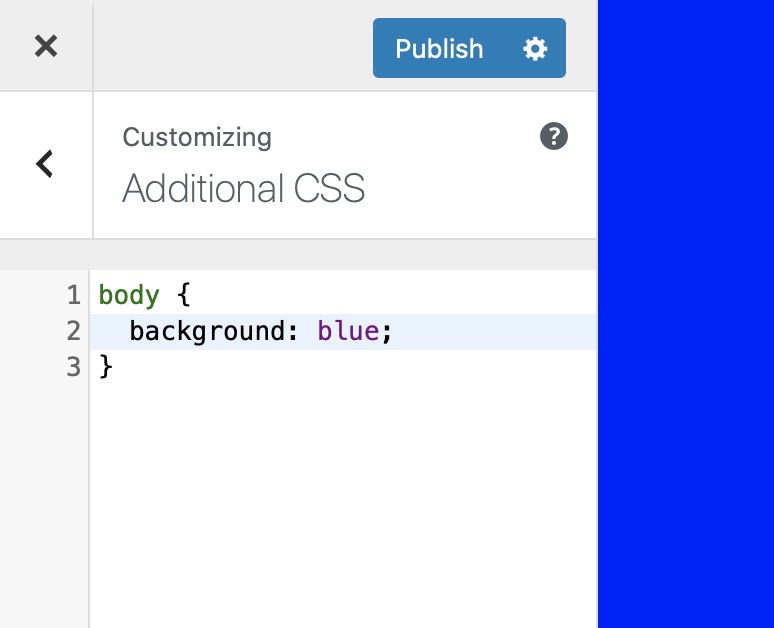
Same tradeoff as the Site Editor method: your CSS lives in the database, not the theme, so it survives theme switches. Simple, reliable, and works on every classic theme.
Method 3: Simple Custom CSS plugin
If you’d rather not open the Customizer or Site Editor every time you want to edit CSS, the Simple Custom CSS plugin gives you a dedicated standalone page under Appearance → Custom CSS.
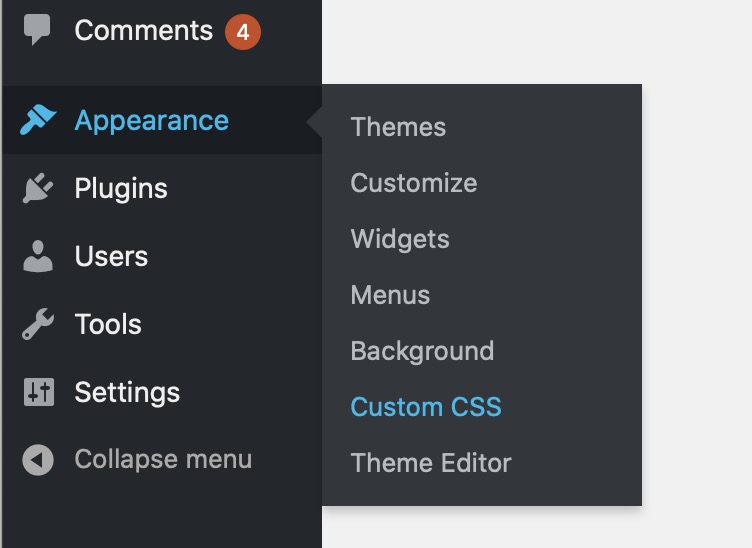

Same result as the built-in methods; just a different UI. Worth it if you’re editing CSS frequently and don’t want to navigate through the Customizer every time.
Method 4: Child theme style.css (for bigger projects)
For bigger CSS projects (more than about 50 lines), version-controlled workflows, or any time you want your CSS in a file you can edit in a proper code editor, a WordPress child theme is the right answer.
Once your child theme is set up, open its style.css and add your custom CSS at the bottom (below the header comment). Make sure the child theme is enqueuing the parent’s stylesheet properly, then your additions layer on top.
/*
Theme Name:   Your Theme Child
Template:     yourtheme
*/

/* Your custom CSS below */

.site-title {
    font-family: Georgia, serif;
    font-weight: 700;
}

.entry-content a {
    color: #dc2626;
    text-decoration: underline;
}
Advantages over the Customizer method: your CSS lives in a real file (easy to version control with Git), survives database issues, loads without the inline-style penalty the Customizer adds, and can be organized into multiple files if the project grows.
Method 5: Page-specific CSS (single post or page)
If you only want a CSS rule to apply to one specific post or page, add a Custom HTML block to that post containing a <style> tag:
<style>
.page-id-42 .entry-title {
    font-size: 3rem;
    color: #7c3aed;
}
</style>
WordPress automatically adds a body class like .page-id-42 or .postid-1234 to every page, which you can use as a scope selector. This is the easiest way to change styling on a single page without polluting your site-wide CSS.
For page-builder users: Elementor, Divi, and Bricks all have per-element CSS options in the widget settings, which is cleaner than adding a <style> block.
How to find the right CSS selector
The hardest part of custom CSS isn’t writing it; it’s figuring out which selector targets the element you actually want to change. Use your browser’s dev tools:
- Open the page where the element lives.
- Right-click the element you want to style and choose Inspect (Chrome, Firefox, Safari, Edge, all the same).
- The dev tools panel shows the HTML tree and the CSS rules currently applied. Look at the class and id attributes on the highlighted element.
- Use those in your custom CSS selector. For example, if the element is
<h1 class="entry-title">, target it with.entry-title { ... }.
Chrome’s dev tools also let you edit the CSS right there in the browser to preview changes before you commit them to WordPress. It’s the fastest feedback loop for experimenting.
Why your custom CSS isn’t working
Custom CSS that doesn’t apply usually comes down to one of these four things.
1. Caching
The most common cause. WP Rocket, Solid Security, Cloudflare, and most hosting providers cache CSS. You changed it, the server still serves the old version. Clear your page cache, your browser cache, and any CDN cache. If you’re on WP Rocket, use its Clear Cache option in the admin toolbar.
2. CSS specificity
Your theme’s built-in CSS is probably more specific than yours. For example, .site-content .entry-title beats .entry-title. Make your selector more specific by adding parent classes, or add !important as a last resort:
/* If your theme's CSS wins, get more specific */
.site-content .entry-title {
    color: red;
}

/* Or force it (use sparingly) */
.entry-title {
    color: red !important;
}
Open dev tools and look at the Styles panel; the rule that wins shows up with others struck through. Whatever’s overriding you is what you need to beat on specificity.
3. Wrong selector
The class or ID you targeted doesn’t match the actual element. Dev tools tells you the correct class. Also watch for typos. CSS fails silently, so one misspelled selector just does nothing without an error.
4. Syntax errors earlier in your CSS
A missing semicolon, unclosed bracket, or typo in a property name can break everything after it. The Customizer CSS editor catches most of these with red underlines, but the Simple Custom CSS plugin and a child theme’s style.css don’t. Validate your CSS with the W3C CSS Validator if something’s mysteriously broken.
Frequently asked questions
Where do I add custom CSS in WordPress?
On a block theme (Twenty Twenty-Four and newer): Appearance → Editor → Styles → Additional CSS. On a classic theme: Appearance → Customize → Additional CSS. For bigger projects, add CSS to a child theme’s style.css file. All three survive theme updates.
Why isn’t my custom CSS working in WordPress?
Four common causes: caching (clear WP Rocket / Cloudflare / browser cache), specificity (your theme’s CSS is more specific; add parent classes or !important), wrong selector (use browser dev tools to find the actual class), or a syntax error earlier in your CSS that breaks everything after it. Open dev tools and check the Styles panel to see which rule is winning.
Does custom CSS survive theme updates?
Yes, if you add it through the Customizer, Site Editor, Simple Custom CSS plugin, or a child theme. All four store your CSS outside the parent theme’s files, so parent theme updates don’t touch it. Don’t edit the parent theme’s style.css directly. That file gets overwritten on updates.
How do I add CSS to a single page in WordPress?
Add a Custom HTML block with a <style> tag inside it, and scope your selector using WordPress’s automatic body classes like .page-id-42 or .postid-1234. Example: .page-id-42 h1 { color: red; }. For Elementor / Divi / Bricks users, per-widget CSS options in the builder are cleaner.
What is !important and when should I use it?
!important forces a CSS rule to win regardless of specificity. Use it as a last resort when you can’t beat the existing CSS by writing a more specific selector. Overusing it makes your stylesheet hard to maintain (you end up fighting !important with more !important). Check browser dev tools first to see why the current rule is winning, and try a more specific selector before reaching for the nuclear option.
Can I add CSS to a block theme without editing the theme?
Yes. Open the Site Editor (Appearance → Editor), click the Styles icon, open the three-dot menu in the Styles panel, and choose Additional CSS. Your CSS is stored in the site’s global styles (database), not the theme files, so theme updates don’t affect it and the CSS travels with your site if you switch themes.
How much CSS can I add in the WordPress Customizer?
Technically a lot (the field is stored in the options table), but past about 50-100 lines the Customizer becomes awkward to work in. For bigger projects, move to a child theme’s style.css file where you can use a proper code editor, version control the CSS, and split it into multiple files if it grows further.
Bottom line
For small CSS tweaks: Additional CSS in the Customizer (classic themes) or the Site Editor (block themes). Both ship with WordPress and both keep your CSS safe across theme updates. For bigger, file-based CSS workflows: a child theme’s style.css. For a single page: a Custom HTML block with a scoped selector. When CSS doesn’t work, 90% of the time it’s caching or specificity, so open dev tools, clear your caches, and figure out which rule is winning.
If you’re new to CSS entirely, Codecademy’s Learn CSS and MDN’s CSS reference are the two resources worth bookmarking. For more ways to customize WordPress, see the full child theme guide or browse our useful WordPress code snippets.


One Response
This is really a great article, I start learning how to make my own CSS for my site that’s why this article is helpful for me.